Learn How To Cook Brown Basmati Rice In A Uniquely Indian Style

Rice is the classical carbohydrate you often see on your plate. Whether it’s partnered with steak, egg, or steamed vegetables, no other starchy food can beat rice! What’s even more fantastic about rice is that it can be served in many different varieties.

Here, we will be talking about a special version that came from the colorful culture of Asia – Basmati Rice.

More…

What Is Basmati Rice?

It is considered to be one of the best varieties or rice. Basmati comes from the Sanskrit word “vasmati”, which means aromatic. This long-grained, fragrant, and nutty-flavored rice is cultivated in the beautiful fields of India and Pakistan. It is grown through traditional methods, which produce naturally fresh grains.

There are contrasting ideas about how basmati rice should be cooked, including whether it should be soaked first or not, boiled or not, and how high the water level should be. But, having cooked rice for many years, I think the ratio-based boiling method works the best.

Five Tips On How To Cook Basmati Rice

  1. Look for the best quality Pakistani or Indian basmati. Find ones that are locally available and affordable.
  2. Rinse the rice thoroughly for a few minutes; this helps to remove the stickiness of the starch.
  3. You can try adding salt in the cooking pot before pouring some water, as this allows the rice grains to absorb the salt well. Never add salt to cooked rice; it will make it taste extremely salty.
  4. An aluminum foil or a tight-fitting lid is ideal way of creating a strong seal. This will stop the steam from escaping. If you cover the pot with a tight seal, it produces long soft grains.
  5. You can add a few drops of plain vinegar, which separates the grains well.

How To Cook Basmati Rice?

To get started, here are the things you need:

This recipe yields 4 cups of cooked Basmati rice, quite enough for a family of four! If you wish, you can add or subtract the amount of ingredients according to the number of the people you will serve.

To get started, here are the things you need:

  • 2 1/2 cups Basmati rice.
  • 2 1/2 cups boiling water.
  • Pinch of salt to taste; the amount depends on your taste.
  • Measuring spoons, cups, strainer, bowl, and sauce pot with lid

What to do:

  • First of all, wash the rice under cold running water then rinse it well by using a strainer. If you prefer to soak it, you can place the rice in a bowl of cold water and let it soak for an hour. This helps to make your rice softer. Or you can skip this step, especially if don’t have enough preparation time.
  • Secondly, transfer your newly rinsed rice to a sauce pot with tight lid. If you have tried the soaking method, make sure you drain the rice well and transfer it into a saucepan while adding a pinch of salt.
  • Meanwhile, boil 3 cups of water in a kettle or another pot and pour onto the rice. Cook and cover with the lid or tight foil. Set to medium-high heat. Once the water is steaming and boiling, use aluminum foil again to cover the pot and crimp the edges around the pan. Then, seal it with a lid on top, as this will to prevent the steam from escaping. Change to low-high heat and let it cook. After 15 minutes, remove the pot from the heat.
  • You can now uncover the pot and fluff with a fork.
  • Serve while hot!

What To Serve With Basmati Rice?

Basmati rice tastes better when partnered with an Indian dish too like Masala Lamb Meatballs!

1. Masala Lamb Meatballs

Meatballs are the life and soul of the party! Whether you are a kid or kid at heart, you will absolutely love making this recipe with our Basmati rice.

Yield: 20 meatballs.

  • 1 pound ground lamb.
  • 1 pound lean ground beef.
  • 1 onion, finely grated.
  • 1/2 ginger root, peeled and finely grated.
  • 3 garlic cloves, crushed.
  • 2 teaspoons salt.
  • 1/2 teaspoon black pepper, freshly ground.
  • 1/2 teaspoon chili powder.
  • 1 tablespoon garam masala.
  • 1 tablespoon cilantro, finely chopped.
  • 2 tablespoon almonds, ground.
  • 1 egg, beaten.
  • 1/4 cup flour.

Instructions:

  1. Combine the beef and lamb well, and then mix the remaining ingredients together, before adding the meat mixture.
  2. Preheat the oven at 450°F.
  3. Mold the mixture into walnut-sized meatballs.
  4. Roast the meatballs until they are pink in the middle.
  5. Serve with Basmati rice.

2. Kerala Chicken Curry

Taste the creaminess of the coconut mixed in with the juiciness of the chicken meat.

Yield: 3 servings.

  • 3 shallots, peeled and sliced in half.
  • 1/2 cup unsweetened coconut, grated.
  • 2 dried red chilies.
  • 2 whole cloves.
  • 1 tsp. black peppercorns.
  • ½-inch cinnamon stick.
  • 1 1/2 green cardamom pods.
  • 1 tsp. fennel seeds.
  • 1 tsp. coriander seeds.
  • 1/2 tsp. cumin seeds.
  • 1/2 tsp. brown mustard seeds.
  • 1/2 tsp. turmeric powder.
  • 2 lb boneless skinless chicken thighs, cut into match-sized pieces.
  • 1 yellow onions, sliced.
  • 1/2 tbsp. vegetable/coconut oil.
  • ½-inch ginger, peeled and minced.
  • 1 tomato, sliced.
  • 1 garlic clove, minced.
  • 1 1/2 tsp. salt.
  • 1/2 tbsp. vinegar.

Instructions:

  1. If you are using an electric pressure cooker, set the heat to its brown setting.
    If you are using a stovetop pressure cooker, adjust the pot over a medium heat.
  2. Cook the shallots and red chilies together until black spots appear. Remove and set aside.
  3. Add the coconut and whole spices to the pressure cooker. Cook and stir for about 1 minute or until the coconut turns light brown.
  4. Incorporate the turmeric and stir thoroughly; then transfer the coconut and spices to the food processor bowl.
  5. Mix until smooth. You can add 4 tablespoons of water to create a creamy paste. Set aside.
  1. Pour oil into the hot pressure cooker and incorporate the ginger, garlic, and onions.
  2. Sauté until the onions become soft and brown. Add the coconut spice paste mixture.
  3. Fry and add the tomatoes. Then add the chicken, salt, and vinegar. Combine well.
  4. Cover the pressure cooker and cook under high pressure for 10 minutes.
  5. Check if the chicken is already tender.
  6. Serve with Basmati rice.

Add some fine unique Asian taste to your table by serving the family with Basmati rice! You’ll never run out of ideas on different ways to cook this rice.

Feel free to share what you think, as well as your cooking experiences, by commenting below. Happy rice cooking!

Rada Cutlery Reviews: A Guide To Rada's Knives And Kitchen Utensils

If you are looking to get some new cutlery for your kitchen, there are many options currently available that will provide you with different qualities, features and levels of performance. In fact, there are a plethora of factors that can determine your choice, even the brand name.

The majority of us think that the best knives are expensive. Well, there is a certain truth in this, but you can also get decent cutting knives in the entry and mid-level price categories. Rada Cutlery is proof of that.

Rada Cutlery is a kitchen tool manufacturer based in Iowa, America. The utensils are durable, ergonomic and brimming with quality. If you don’t believe me, go check out the independent testimonials of people who have used these tools. You can also check out the Rada Cutlery reviews that I’ve written below to see why this brand is so popular nowadays!

More…

Rada Cutlery Reviews

Rada Cutlery Reviews: Knives And Gift Sets Reviews

Rada Cutlery’s main products are knives and knife packages. Their various gift sets provide a good deal, especially during the holidays or special seasons. I have tried some of them and here are my impressions of each of them:

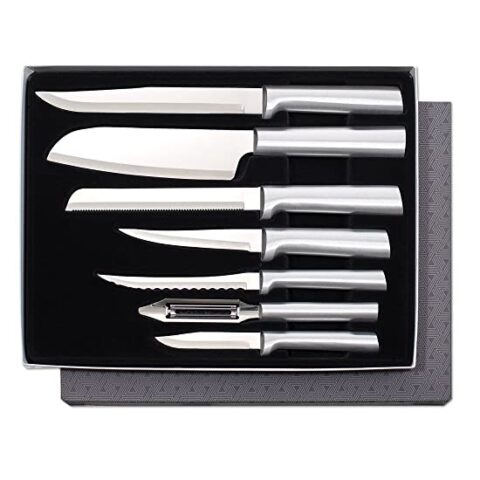
1. Rada Cutlery Starter Gift Set – Best Beginner Knife Set

Image from Amazon.com

The first one I encountered was this beginner knife set from Rada Cutlery. The package offers a variety of knives that work well in any cooking application. Everything you need, from a paring knife to tomato slice, is present in this package. Once you have got this set in your kitchen, your ability to cut and slice will be greatly enhanced.

The Rada Cutlery Starter Gift Set offers seven knives that are made from high-quality materials, so their edges won’t get brittle easily. The handles are cast silver aluminum with a satin finish. You should always hand wash this cutlery, so make sure that you don’t stick them in your dishwasher.

These knives are easy to use because they are so gentle on your hands. They won’t let your palms or fingers get sore, regardless how much you use them. Their impressive usability can also be attributed to the sharpness of their blades. The knives in this gift set are sharp enough to turn common meat and hard veggies into pieces.

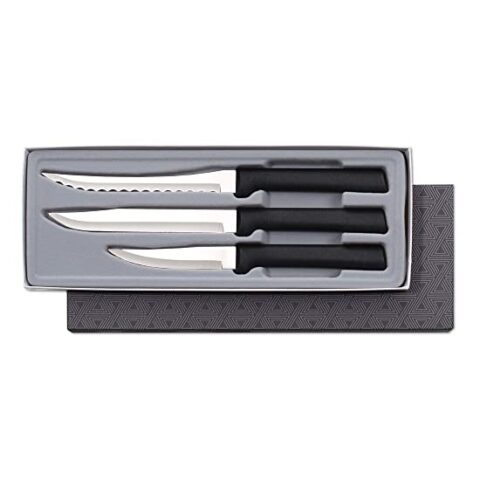
2. Rada Cutlery Cooking Essentials Gift Set – Best Professional Knife Set

Image from Amazon.com

Another excellent Rada Cutlery package that I adore is the Cooking Essentials Gift Set. Unlike the first gift set that I recommended earlier, this one only comes with three knives: a paring knife, steak knife, and tomato slicer. But this is not a problem, as you can slice, dice, and peel with utmost precision and agility with these knives. In fact, they are among Rada Cutlery’s top selling knives.

All of the blades have been crafted from industrial-grade stainless steel, which is famous for being extremely durable and sharp. They are a delight to use, and by practicing with these knives, you can really hone your cooking skills. You might even attain professional cooking results, which is always a great thing to dream of.

The handles of the knives are made from a stainless steel resin that is dishwasher safe, unlike those in the Rada Cutlery Starter Gift Set. Some say that hand washing is a better and safer choice, but if you don’t want the hassle of hand cleaning them, then it’s fine to put these knives in the dishwasher. 

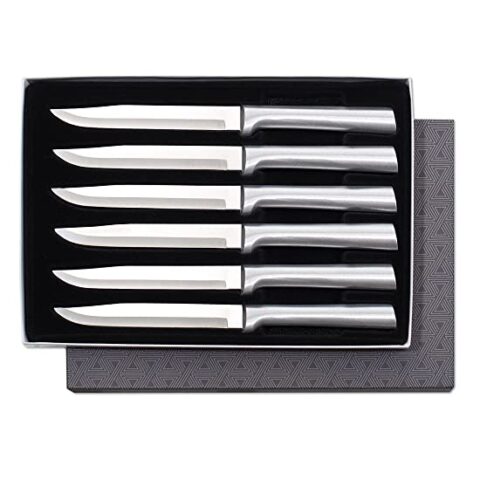
3. Rada Cutlery Utility Steak Knives Gift Set – Best Steak Knife Set

Image from Amazon.com

Are you a huge fan of steaks? If the answer is yes, then the Rada Cutlery Utility Steak Knives Gift Set will be perfect for you. Each of the knives here is a top-selling steak knife. They all are around 8 1/2 inches long, and the blades are roughly 4 3/4 inches.

Nobody can resist these knives. Just by looking at them, you can see they have all been constructed to the highest standards. They look sleek and elegant, which makes them perfect to display in your kitchen. The knives are also moderately weighted, so they are neither too heavy, nor too light. This means they will offer you just the kind of maneuverability that you need to cut thick slices of steaks.

The blades are slightly longer, compared to other steak knives, and unquestionably sharp. The edges are non-serrated too, which enables them to have a quick bite on the flesh.

As well as being perfect for steaks, you can use the Utility Steak Knives to slice and dice other kitchen ingredients because they are sharp, flexible, and practical. 

4. Rada Cutlery Paring Knife Set – Best Paring Knife Set

Image from Amazon.com

This set is something that you should definitely include on your shopping list as you will be astonished by the quality and performance that each of these paring knives offer. The knife set includes the following cutlery tools: a peel paring knife, heavy duty paring knife, and regular paring knife. They all have different blade sizes, which allow you to use them in different cooking applications. You won’t need any other options once you get your hands on this package. Even I was dumbfounded by their quality.

This knife set comes in an ergonomic case, which prevents the blades from losing their edge and sharpness, and inserts have been form-fitted to the knives, which will keep them in place all of the time. In short, this case acts like a portable knife block.

Just like the Rada Cutlery Utility Steak Knife Set, the handles of the Paring Knife Set are dishwasher safe. This is because they are made out of a stainless steel resin that won’t get damaged in the machine.

The handles are smooth and gentle to your hands as well. They provide a good grip, which is essential if you want to tackle hard meat cuts. There is also a blade guard that will protect your hands from slipping through the blades.

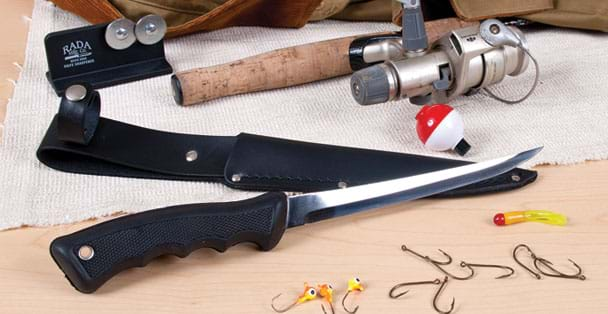
5. Rada Cutlery Fillet Knife – Best Fillet Knife

Image from RadaCutlery.com

Dealing with fish is not that easy, especially if you just use ordinary knives. You might want to try an electric fillet knife, but for those who cannot afford this tool yet, you can grab this offer from Rada Cutlery. They have a fillet knife that can easily cut any variety or size of fish. If you are fishermen or a fish lover, this fillet knife should be present in your kitchen.

The Rada Cutlery Fillet Knife is impressively light, flexible and durable, as the sharp blade is crafted from surgical-grade high carbon stainless steel. The blade was not sharpened by any machine. Instead, it was hand-sharpened by skilled cutlery workers. This level of engineering and construction means the knife can easily cut through fish, right down to the bones.

The grip of this fillet knife is superb as well. The handle’s black rubber cover enables you to hold it with precision and safety. There are also crevices on the knife that enhance your finger grip. As a result, the knife can offer you a slip-free performance, even if it is wet.

The craftsmanship and quality of this fillet knife means that it can be used by simple house cooks and professionals alike. You will never go wrong if you try this knife.

6. Rada Cutlery French Chef Knife – Best French Knife

Image from Amazon.com

The Rada Cutlery French Chef Knife is a versatile knife with a premium build and performance that makes it arguably one of the best professional chef knives on the market today. It that you can use to chop, mince, and dice different ingredients in your kitchen. The knife will do all the dirty work for you, even if you don’t try hard, leaving you with professional-grade results.

The 8 1/2-inch blade of this French knife is durable and razor sharp, with a great cutting capacity, enabling it to cut through hard ingredients with ease. The T420 high carbon stainless steel blade is of surgical grade, so it is extremely sharp and precise. 

Another good feature of the knife is its handle. This is smooth and provides a non-slip performance, even if things get too wet. It can also offer the control and maneuverability that kitchen chefs require. The only drawback is there’s no blade guard between the handle and the blade. Considering this knife is extremely sharp, you should always exercise caution while using it.

Overall, nothing should discourage you from getting this French knife from Rada Cutlery, it will certainly impress you. 

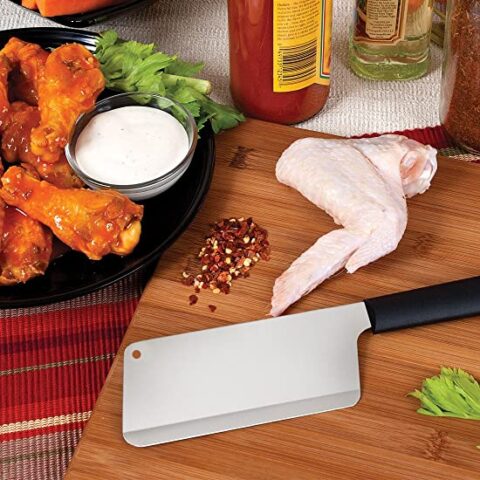
7. Rada Cutlery Chef’s Dicer Knife – Best Dicer Knife

Image from Amazon.com

This dicer knife will be able to help you out when you’re cleaving hard vegetables or meat. It is a professional dicer knife that works well in restaurants and other cooking businesses, and is an ideal choice for cutting ham, ribs, and chicken wings. In fact, any tough ingredients that need to be diced or cleaved can be dealt with by this cutting monster.

The blade of the knife measures around 5 1/4 inches, which is long enough to cut large pieces of meat and vegetables. The blade is powerful and rugged enough to slice through bones like they are nothing. The T420 high carbon steel construction of the knife means it can do the job with ease. It has been hand-sharpened too, which ensures its quality and durability.

The entire knife is neither heavy nor light, which makes it easier to control than its counterparts, and the weight is balanced between the blade and the handle, which provides superior mobility. Its high level of ergonomics make it easier to grip, and the better the grip on your tool, the less chance there is that accidents will happen.

The blade does not get dull or blunted easily because of its high carbon stainless steel construction, and you’ll find that cleaning will never be a problem, since it is dishwasher safe. 

View Product On Amazon.com

Rada Cutlery Reviews: Kitchen Utensils

Apart from its cutting tools, Rada Cutlery is also a leading manufacturer of kitchen utilities. You will certainly love the fact that all of the company’s items and materials are crafted in the United States. They usually offer a lifetime warranty for each of your purchases. The same goes for with the cutlery tools that I’ve featured above.

Meanwhile, here are some of Rada Cutlery’s best kitchen utensils:

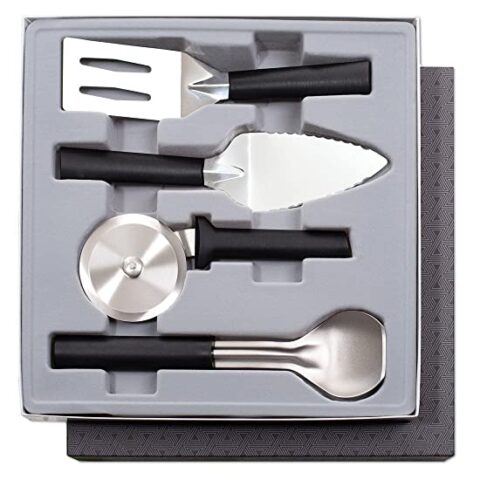
1. Rada Cutlery 4-Piece Kitchen Utensil Gift Set – Best Kitchen Utensil Set For Desserts And Pizzas

Image from Amazon.com

Sometimes, you just want a kitchen utensil set that will give you all of the things that you need. If you are into cooking pastries or pizzas, you should definitely try the Rada Cutlery 4-Piece Kitchen Utensil Gift Set. Dubbed as the ultimate kitchen utensil set, it comes with an ice cream scoop, serrated pie server, spatula, and the ever-endearing pizza cutter. If you don’t have a pizza cutter yet, this package is a good alternative.

All of the utensils are made out of 300 series high nickel stainless steel, which is an industrial-grade material that’s food safe and has passed all the FDA standards. With such a design, you can expect the utensils to be very durable and ergonomic too. They will never leave you disappointed.

These utensils are made to cater for the needs of simple house cooking applications. I cannot say that they could be used for commercial purposes, but I do know they are perfect for your private events and parties, as using them will never stress you out.

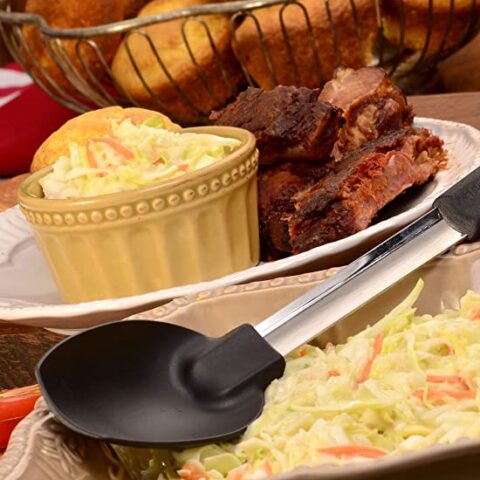
2. Rada Cutlery Non-Scratch Cooking Spoon – Best Cooking Spoon

Image from Amazon.com

Preparing dishes is difficult if you don’t have a reliable cooking spoon at your disposal. Of course, you can find one in your local market and stores, but if you want something that offers you more, try this cooking spoon from Rada Cutlery.

Large in size, it offers a heat-resistant feature. The spoon keeps the heat from transmitting, so you won’t have to wear kitchen mittens or gloves. Furthermore, it has a bowl-shaped head and an even nose, which ensure the spoon can be easily used for serving and stirring.

The durability and toughness of this tool are also both impressive. I was surprised that the stem of this spoon is crafted from high nickel stainless steel, a material which is notorious extremely sturdy, even when it is subjected to extreme heat. Despite being moderately priced, this cooking spoon will last longer than most of its counterparts.

You can use this tool on many delicacies, including macaroni cheese, lasagna, potato salad, and much more. The tool is dishwasher safe and will never compromise the convenience of your kitchen. 

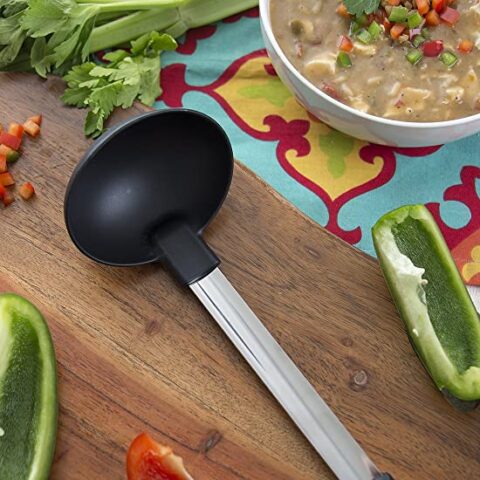
3. Rada Cutlery Non-Scratch Soup Ladle – Best Soup Ladle

Image from Amazon.com

A soup ladle is another essential cooking utensil you should have in your kitchen. After all, most of us love to savor the creaminess and texture of soups. We can’t do it properly, however, if we don’t have the right tools to work with. A large ladle soup like this one from Rada Cutlery will give you the versatility required to handle different soup recipes.

Apart from soups, this ladle can also be used when you make and serve sauces, gravy, and stews. Since it is a large ladle, it can contain up to a 1/3 of a cup of liquid. The measurements of the ladle’s bowl are around 2 3/4 inches x 3 1/4 inches, which is ideal for cooking soups or stews in large servings.

The body or stem of the soup ladle can resist common kitchen detriments and is made to resist high temperatures. Its quality doesn’t diminish even if you subject it to heat constantly. Meanwhile, its handle doesn’t heat up and can be held comfortably. There is also a hole on the end of the handle where you can hang the ladle. By the way, the handle is crafted from reinforced nylon that has heat rejection capabilities.

Washing this utensil is not that difficult, as the entire body is dishwasher safe and has passed the food safety standards of the FDA. 

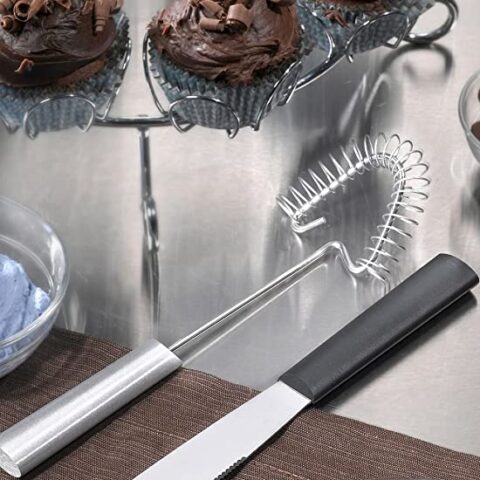
4. Rada Cutlery Wire Whisk – Best Wire Whisk

Image from Amazon.com

A wire whisk might not sound like a priority for you, but once cooking grows on you, you’ll realize that this tool is important too. The Rada Cutlery Wire Whisk is very different from the ordinary wire whisks that you can see in the markets today. It has a practical yet intuitive design that allows you to use it easily and conveniently.

It can reach and grasp even the tightest of corners in your pans and won’t miss a spot because of its unique wire design, so it is a good choice for mixing gravy, sauces, batters, and gelatin. This wire whisk can handle any liquid and semi-liquid mixtures.

The shaft and spring of this utensil are durable and rugged because they are made out of innovative high nickel stainless steel. They don’t cause any harm to the food either. The spring has been ergonomically shaped so that food will never stick to the tool, regardless of its texture. Therefore, cleaning it is not that difficult, even if you can’t wash it in your dishwasher.

The handle of this tool is made from cast silver aluminum that comes with a satin finish, so it “feels” good in your hands, and will improve your control over the wire whisk.

5. Rada Cutlery Metal Grill Spatula – Best Metal Grill Spatula

Image from Amazon.com

A metal grill spatula is an indispensable item for grilling applications. That’s why a lot of people are searching for this product to use at their upcoming tailgate and backyard parties. One of the options you should consider is the Rada Cutlery Metal Grill Spatula, as it can be freely used both inside and outside your kitchen.

It is an excellent choice for making burgers or frying meat, fish, and veggies, and can also be used to retrieve pastries, like brownies or cookies, from a scalding sheet. Since it has a flat head, scooping those treats will never be an issue. Just like the rest of the tools here, the head of this spatula is made from high nickel stainless steel. Its face or the head is noticeably larger than most of its competitors. This design is needed to grill and cook chunky ingredients.

The ridge of this utensil (the area where the head and the handle meet) is rigid, which will improve your ability to handle and maneuver food. Regardless of how sticky or large the food is, the ridge remains stable, and the handle has cool-touch features that stop your hands from being scorched when you’re dealing with food items close to the fire or heat element. 

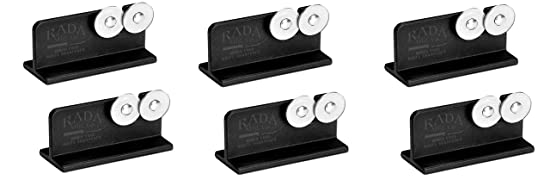
6. Rada Cutlery Knife Sharpener – Best Knife Sharpener

Image from Amazon.com

All knives, regardless of their brands, are useless if the blades are blunt. It is a brutal but honest fact. If you care for your knives and other cutlery utensils, it is imperative that you invest in a sharpener. You can either go for a manual sharpener, an electric sharpener, or a stone sharpener. It doesn’t matter which you choose because they are all good, and as long as you’ve got one, your knives will always be in top shape.

One of the finest sharpeners that I have tried is the Rada Cutlery Knife Sharpener, which has a construction and design that is different from the conventional knife sharpeners that you see today.

The steel wheels are affixed to the main body of the sharpener are positioned in a way that sharpens any knives at an optimal rate. The only thing that you need to do here is to run the blade through the hardened wheels until their sharpness is restored.

Perhaps the only downside here is that this sharpener has been designed for knives produced by Rada. I am still not sure if other knife brands are compatible with this tool. So, for now, it is best just to use it just on Rada knives.

View Product On Amazon.com

Final Thoughts

Overall, you should never underestimate the quality of Rada tools. Even if they are not the leading producers of kitchen utensils, they are doing well in a competitive market. Moreover, most of their tools comply with the modern standards of the culinary world, and their design and engineering ensure they are all food-safe.

I hope these Rada Cutlery reviews will have introduced you to the quality of this brand. If you know other kitchen utensil brands that are worth featuring, then let me know in the comments section below, and I will do my best to research and introduce the capabilities of their products!

There’s nothing in this world that excites me more other than cooking. From appetizers to desserts, since then, I’ve always been passionate on making foods.

Delightful Frozen Spaghetti Squash Recipes That Will Rock Your Day

Frozen food! Some people raise an eyebrow when frozen food is mentioned, as they like it fresh from the garden or the sea!

In my last article, I talked about spaghetti squash and the benefits of freezing it. This showed you that freezing or storing fruits and vegetables is not bad as long as you do it properly.

Now that we have covered freezing, let’s move on to frozen spaghetti squash and find out the numerous recipes we can make with it, as well as the many benefits this vegetable give us. Even though it’s frozen, it has many advantages that may surprise you.

More…

Frozen Spaghetti Squash

The Benefits Of Using Frozen Vegetables

  • Your favorite vegetables may not be available in your local market because they do not grow in your country or are out of season.
    In that case, frozen vegetables can come to the rescue! They are easy and convenient as you can buy them from the local grocery shop.
  • • You might be surprised to know that frozen vegetables have a lot of vitamins in them and there is only a small difference in nutrient content compared to fresh ones.
    As frozen vegetables are not exposed to light, the beta-carotene in them is largely preserved. Carotene is destroyed by exposure to light.
  • The vegetables are frozen right after the harvest so they are high in nutrients, while fresh vegetables travel a distance from the farm to where they are sold. Some of them travel far. As a result, their exposure to certain temperatures can affect the level of vitamins and minerals in them.

Tips

  • The best frozen food has a high content of vitamins E, A, carotenoids and fast-soluble nutrient. It is also extra firm while being stored. So make sure that you do your research and look out for it when you hit the frozen aisle!

Delightful Recipes That Use Frozen Spaghetti Squash

These recipes will motivate you to wake up early and start the day! They’ll make you so hungry you’ll be rushing to catch up with what’s cooking.

But first of all, you must learn how to thaw frozen spaghetti squash to get better results. This will enable you to enjoy faster and easier cooking and baking!

How To Defrost Frozen Spaghetti Squash

  1. Take it straight from the freezer and partially thaw the spaghetti squash.
  2. Steam it, stirring occasionally for 10 minutes, or until it is soft but still firm.

1. Low Carb & Gluten Free: Chorizo And Spaghetti Squash Casserole

Prep and cooking time: 30 minutes.

Ingredients

  • 1/4 of a cup of Italian sausage (or any chorizo, like Mexican).
  • 2 cups of spaghetti squash that’s cooked and thawed.
  • ½ cup of grated or shredded cheese (cheddar or other cheese you prefer).
  • 1/2 cup of tomatillo salsa (salsa verde).
  • 4 large eggs (organic).
  • ¼ cup of spices, like cilantro, or your choice of garnish.

How to do it?

  1. Prepare your thawed spaghetti squash.
  2. Fry your chorizo until it is brown.
  3. Add the tomatillo salsa and the squash in the pan for a few minutes until the liquid has been reduced.
  4. Turn off the heat, scoop your mixture and add the cheese.
  5. Slowly put it into the greased baking pan and distribute it evenly.
  6. Press four areas on top of the tomato/salsa mixture with a spoon (a circle with hollow dents) and crack the egg on top of each of them.
  7. Bake for 20 minutes (375 degrees F).
  8. Time to take it out of the oven and garnish with your favorite spice. It’s now ready for breakfast!

2. Baked Spaghetti Squash With Tomato Meat Sauce

Prep Time: 15 minutes.

Cooking Time: 15 minutes.

Ingredients

  • 1 lb of thawed spaghetti squash.
  • Olive oil.
  • Salt and pepper.
  • Strips of chopped and cooked bacon.
  • 4 eggs.
  • Cheddar cheese.
  • Green onion.

How to make it?

  1. Prepare your thawed spaghetti squash in a baking pan.
  2. Sprinkle the bacon and cheese on top.
  3. Press a spoon on top (2 circle with hollow dents) and break an egg on each.
  4. Bake it for 15 minutes (400 degrees F).
  5. When it’s done, take it out, and garnish with green onion. It’s breakfast time!

3. Spaghetti Squash Hash Browns

Total time: 15 minutes!

Ingredients

  • 1 lb of thawed spaghetti squash (take out as much water as possible).
  • ¼ teaspoon of garlic powder.
  • ¼ cup of chopped chives.
  • 1 egg.
  • 1 teaspoon of coconut oil.
  • ½ cup of grated cheddar cheese.
  • Salt and pepper for seasoning.

How to do it?

  1. Prepare your thawed spaghetti squash in a bowl.
  2. Mix in the garlic powder, chives, salt and pepper, and then mix well.
  3. Cook the mixture in your greased skillet over a medium heat for 10 minutes. Keep on stirring!
  4. When it reaches a golden brown color, it is ready.
  5. Garnish on top with the grated cheddar cheese. Enjoy!

4. Spaghetti Squash Fritters

Time needed: 20-25 minutes!

Ingredients

  • 2 pounds of thawed spaghetti squash.
  • 1 teaspoon of salt.
  • 1/8 teaspoon of grated nutmeg.
  • 1 teaspoon of dried sage.
  • 1 green onion, thinly sliced.
  • Minced garlic, 2 cloves.
  • ½ teaspoon of ground pepper.
  • 2 ½ ounces of crumbled goat cheese.
  • 1 teaspoon of dried orange peel.
  • 1 egg.
  • 2 ½ tablespoon of arrowroot powder.
  • ¼ cup of canola oil.

How to do it?

  1. Prepare your thawed spaghetti squash.
  2. Mix the squash, sage, nutmeg, scallion, garlic, pepper, cheese and the orange peel in a bowl.
  3. Put the egg and arrowroot powder in the bowl and mix them well.
  4. Form the fritters by hand.
  5. Fry it in hot oil in batches. You may like it brown and crunchy or just cooked enough (5 minutes).
  6. Remove from the frying pan and drain it with paper towels.
  7. Season with salt and eat the fritters while they’re hot!

5. Cheesy Spaghetti Squash Melt

Time needed: 20 minutes!

Ingredients

  • 2 pounds of thawed spaghetti squash.
  • 1 teaspoon of olive oil.
  • ¾ teaspoon of salt.
  • 1 clove of garlic, minced.
  • ½ teaspoon of dried oregano.
  • ½ teaspoon of thyme.
  • 1 tablespoon of chopped fresh parsley.
  • 1 pinch of red pepper flakes.
  • 1 cup of tomato sauce.
  • 1 garlic clove, peeled.
  • ½ a cup of shredded cheese.

How to do it?

  1. Prepare your thawed spaghetti squash.
  2. Heat the olive oil in a large frying pan over a medium heat.
  3. Stir in the minced garlic for a few seconds, until it turns a little brown and smells good.
  4. Add in the spaghetti squash and the rest of the herbs and spices.
  5. Cook for 12 minutes until it is soft.
  6. Add the tomato sauce and gently stir for 3 minutes.
  7. When it is done, scoop it into your baking tray or cups (whatever you prefer), and sprinkle with grated cheese.
  8. Put it in the broiler for a minute or until the cheese is melted. This is good on toasted bread too!

6. Chicken Paprika With Spaghetti Squash

Prep: 30 minutes.

Cooking time: 30 minutes.

Ingredients

  • 2 lbs of spaghetti squash.
  • 2 tablespoons of olive oil.
  • Onion, cut into thin wedges.
  • Garlic, cut into pieces (2 cloves).
  • 1 green pepper, diced.
  • Small portion of paprika (about 2 tbsp).
  • A dash of salt, or according to taste.
  • 1 tsp. of caraway seeds.
  • Spice, ground black pepper, to add.
  • Boneless chicken breasts, preferably skinless, cut into halves.
  • Peeled tomatoes, which you can buy in cans (14.5 oz).
  • ½ cup of Daisy sour cream (any brand will do).

How to do it?

  1. Prepare your thawed spaghetti squash.
  2. Heat the oil in a big frying pan for over for a minute (on med-high).
  3. Fry all the ingredients (except for the squash and chicken) for about 5 minutes. Cook and stir until the onion is tender.
  4. Remove from the heat and set aside.
  5. Lower the heat to medium and fry the chicken for 10 minutes until it is brown on all sides.
  6. Remove the chicken and slice it diagonally.
  7. Put the onion mixture and the cut chicken back into the pan, add in the tomatoes and simmer!
  8. Combine the spaghetti squash with the chicken breasts and veggies until they boil. Turn down the heat to low for 10 minutes.
  9. Add in the sour cream as you please. Enjoy!

These are just a few of the many recipes that you can make out of frozen spaghetti squash. You can make them by using fresh spaghetti squash instead, of course, but it will take long time as you’ll need to cook the squash first.

I hope you’ve now realized that frozen veggies are just as nutritious as fresh ones, if not better. Learning how to take advantage of them will make your kitchen routines quicker, easier and more comfortable and convenient. It will never be the same!

Share this new cooking adventure with your friends and pass on these helpful tips. It makes everyone’s life better! I’m waiting for your comments here. Till next time!

Classic Kiddies' Favorites: How To Make Crispy Corn Nuggets

Corn nuggets! They’re a nice, quick and crispy tender snack for all, which are cooked in different way to deep-fried or baked corn. Care to do an experiment? Add a bit of jam and honey to the nuggets and see what the outcome is. Since this delicious treat is so simple, it really is easy as pie to learn!

Simple steps, simple things, simple food! Making this recipe won’t do you any harm. The texture of this meal can be rough but it doesn’t taste rough at all! So grab your apron and frying pan, and get ready to learn “How to Make Crispy Corn Nuggets”!

How To Make Corn Nuggets

What Are Corn Nuggets?

Well,  they are a simple yet delightful little snack for everyone! They were originally made in the South part of the United States, where they are a traditional snack. The nuggets are made of flour, egg, milk, and butter. You can also add cheese and pepper if you want to make cheese corn nuggets.

As I said, they can be cooked in different ways:

  • Using a skillet.
  • Deep fried, using a deep fryer.
  • Baked, using an oven.

Although there are three different ways to cook them, there will always be the same outcome. The only difference is the appliances and tools you’ll need.

Deep-frying is the most commonly used way of making this recipe, but you are encouraged to choose the method that suits your best and you’re comfortable with. They are great for snacks for kids, appetizers for parties or even finger food when watching movies.

What Do I Need To Get To Make Corn Nuggets?

These things are easy to find, so thankfully it won’t be too much hassle. There is a range of many different types of corn, like dent corn and flint corn, that are widely used for making nuggets is the sweet corn.

Making Corn Nuggets Using A Deep Fryer

Here are the ingredients that you are going to need to make corn nuggets:

  • 1 can of creamed corn.
  • 1 can of kernel corn (with the water drained).
  • ½ cup of yellow corn meal.
  • 1 egg (only the white is needed).
  • 2 tbsp. of milk.
  • Salt and pepper for seasoning.
  • 3 cups of oil of your choice (for deep-fat frying).
  • ¾ cup of grated cheese.

For the coating:

  • Flour.
  • Water.
  • Breadcrumbs.

Tips

  • Sweet corn is best suited for corn nuggets due to the sweetness of its juice and how much milky substance comes out of it.
  • Creamed corn is made when a corn’s creamy juice is extracted from it.

How To Cook Them

Cooking these nuggets is as simple as making scrambled eggs in a frying pan in your kitchen. The only difference is that it’s a different recipe. How do you make them? Follow these easy steps and get it all done in no time:

 Step #1  Prepare the ingredients.
 Step #2

If you are using fresh corn, which you’ve bought or grown yourself, put it in a pressure cooker for at least 5 minutes, but no longer than that.

 Step #3

After cooking it for at least 5 minutes, take the corn out, let it cool down and take out the corn kernels.

 Step #4

Grind at least three quarters of the kernels (coarse).
If you are not using fresh corn, there is no need for steps 2 – 4. Just replace it with canned corn. ​

 Step #5

Combine all of the ingredients together in a medium-sized bowl (do not include the oil and the ingredients for the coating) and mix them well.

 Step #6

When you’ve finished mixing them all together, divide the mixture into a small little flat circle, like cutlet balls.

Step #7 

Mix the flour and water in a separate bowl and dip the flat cutlet balls into the Maida Batter when you’ve finished. Then, roll each one of them in breadcrumbs.

 Step #8

Deep fry them in oil (180 degrees C) until they are the color of crispy gold. You can use either a deep-fat fryer or big skillet. Put the nuggets on some paper towels to drain. Place them on a plate when you are done. After that…

DIG IN AND ENJOY THIS GREAT MEAL OF CORN NUGGETS!!!

The above recipe is good for deep-frying. Here is how to do it by using the two other methods.

How To Cook Corn Nuggets Using An Oven

If you are going to cook them using an oven, this is what you do:

 Step 1 – 7

Will be the same, but in step #8 there is a difference.

 Step #8

Place the cut nuggets onto baking sheets and arrange them so that they are not touching each other. Otherwise, they will stick together.

 Step #9

Bake them at 200 degrees C for 12 minutes (turning them after 6 minutes). Take the nuggets out, let them cool, and serve!

How To Cook Corn Nuggets Using A Skillet

There is only have a slight difference between using a deep-fat fryer and a skillet

  • With deep-fat frying, your nuggets will be browned and evenly cooked. It is also a faster and easier method.
  • With skillets, you will need to make sure that the nuggets do not burn, and you’ll need to be vigilant when you’re flipping them to ensure they brown them perfectly. It is your choice.

However, shallow frying does not use a lot of oil. Here is what you need to do:


Step 1 – 7  
Is the same, but in step #8 there is a difference.
 Step #8

When using a skillet, fry them in oil (180 degrees C), making sure they are not close enough to stick to each other.

 Step #9

Flip them from time to time to make sure they are browned evenly and do not get burned. Do it until they are a crispy gold color.

 Step #10 Put the nuggets on paper towels to drain and place them on a plate when they are done.

Want to be creative? Here is a video about how to serve cheese corn nuggets at parties!

Let me show you a video of another interesting way to make cheese corn nuggets more delightful. The chicken nuggets on this recipe are served with greens and achaari mayonnaise.

Additional Tips

Here are additional tips that will help you to make it easier to cook your corn nuggets:

  • You can eat the corn nuggets plain or dip them in your favorite sauce, like tomato sauce, mayonnaise or salad dips.
  • To help the nuggets keep their ball shape, you can freeze them before you coat and fry the nuggets (You can also use any container in the freezer to keep them intact).
  • Do not put too many nuggets into the deep-fat fryer, as it will be harder for you to take them out without the nuggets sticking to each other.
  • Freeze the tray/container before putting the ball-shaped nuggets in. This will make them freeze faster and so cut out the agony of waiting.

For those who love corn nuggets, but do not have time to make them from scratch, there is good news for you! Corn nuggets are available in your favorite supermarkets, and are easy to buy, fry and eat! It is recommended that you make them at home when you have time, since it is healthier to eat fresh ingredients.

Here are a few brands you can find in the grocery stores, and they have different flavors too!

Are Corn Nuggets Healthy To Eat?

Yes, they really are! They are good for the body, your mood, and also your taste buds! Corn nuggets consist of good protein, fats, vitamins, minerals, carbohydrates and also help you with your iron.

Here are their health benefits:

  • Since they have a high level of fiber, the aid good digestion and ease constipation. Usually, getting kids to eat food rich in fiber is hard, but it is so easy with corn since they love it!
  • Their high vitamin B12 and folic acid content means it is highly recommended for pregnant women.
  • Needless to say, carbohydrates give you energy, so give them to your kids as snacks before they start an energetic activity.
  • Corn has beta-carotene so it produces vitamin A, which is good for maintaining sharp vision.
  • It’s also rich in antioxidants, so it can help you to avoid cancer.

What do you call your corn nuggets, and where are you from? Cheese corn nuggets, corn nuggets, corn balls or corn fritters – they are actually all the same. Human beings are so creative when it comes to food, a simple recipe can be made differently in small little ways that all depend on people’s own personal taste and style.

Now that you know all about corn nuggets, I bet you are about to make some on your own. Would you care to share?

Heat On! The Five Best Ways To Reheat Tamales – GimmeTasty.com

When one thinks of Mexican cuisine, a crunchy taco and beefy or beany burrito come to mind. However, one dish that I believe is even better than those two is the traditional tamale. For those unfortunate enough not to know what this fantastic dish is, sit back and enjoy this culinary lesson.

Tamale is a classic dish derived from Mesoamerican cuisine. While there are plenty of variations on this dish, the recipe is made of dough that’s steamed inside a corn husk or banana leaf. This gives the dough a distinct flavor and fantastic corn (or banana leaf) aroma.

The history of tamale is a rich and interesting one. It originated thousands of years ago, and the first pictorial reference to it was found in 100AD in Guatemala. The tamale was also used by the Aztecs and Mayas as a means of taking food along with them on long journeys. Apart from being the perfect lunchbox meal in South America and Mesoamerican areas, it was also considered to be devine food.

Tamale has gradually evolved over the years. The dough in Mexico is filled with lard and sweet and savory (pork or chicken) fillings can be added. Mexicans take tamale seriously, as making them is almost a ritual to them. Tamale also plays a pivotal role in some of their festivals and fiestas.

In Spain, they have tamale filled with tomato sauce. This is called the green corn tamale. In Trinidad and Tobago, tamale is called pastelle, and is an extremely popular Christmas food. They are filled with meat fillings, raisins and other seasonings. While in Asia, they have tamale dishes with meat, seafood, or coconut milk fillings!

As you can see, tamale is a very well-traveled dish that crosses cultures and is extremely popular!

So today, I want to help those of you who love munching tamale (which includes me, of course!). If you have cooked too much and have a lot of leftovers, then reheating them the next day again is a big no-brainer (nothing could be sadder than wasted tamale). However, heating tamales the right way is no easy task, as they can end up dry and starchy if you are not careful. So today, I want to help you learn how to heat tamale properly.

So get your Mexican hats and fiesta face ready, because here are the five best ways to reheat tamale.

More…

Tamale Reheating

Five Best Ways To Reheat Tamale

1. The Oven Is Your Best Buddy!

The almighty oven is one of the best ways to heat tamale. While it will take a bit longer than the other methods included on this list, the wait is well worth it.

The first thing to do is preheat the oven to about 220 degrees Celsius. As you are waiting for your oven to get hot, wrap the tamales in tin foil twice and place them in an oven-safe pan, making sure that you space the tamale out. Place them on the middle rack inside your oven and wait for twenty to twenty-five minutes.

  • Pro Tip: Take your tamales out halfway through to make sure that the dish is heated evenly.

2. It’s Pan Time!

The pan is another great way to reheat tamale, and the sear of the pan adds a desirable crunch to the dough. Start by peeling the husks from the tamales and throwing them away. Prepare your pan and set your stove to a medium heat, then add one teaspoon of canola or olive oil and wait for about two minutes (you will notice a bit of smoke when the oil is ready). Once the pan is sufficiently heated, slowly add the tamales.

Cover your pan with a lid. The whole reheating process should be finished in about eight minutes. Keep flipping the tamales every now and then to ensure they are heated evenly. Once the tamales have a golden brown color on each side, they are done. Serve hot on a plate and enjoy!

3. Time To Steam!

Using a steamer is another excellent and easy option. All you need to do is to fill your steamer pot with about ¼ of clean water, place it on your stove, and set the heat to medium. Allow the water to heat up for about eight minutes. Put your tamales on the rack (line them up so that they don’t touch one another) and place in the steaming pot. Make sure the tamales don’t touch the boiling water.

Cover the steaming pot and leave the tamales for about 20 minutes. Check them once in a while to see how they are doing, and once you feel they are cooked thoroughly, serve them hot and enjoy.

  • Pro Tip: Use a food thermometer if you are not experienced enough in the kitchen. Cooked tamales should have an internal temperature of at least 165 degrees Fahrenheit.

4. Pull Out The Deep-Fat Fryer!

A deep-fat fryer is a fantastic option if you want the crispiest tamale! First of all, make sure your tamales have been just refrigerated and not frozen. Preheat your deep-fat fryer and set it to medium, and use canola oil for this one. Once the oil is hot, put your huskless tamale in the deep-frying basket and slowly lower it into the hot oil. Be very extra careful when you do this!

Leave the tamale in the deep-fat fryer for about three minutes. When he tamales get a golden brown texture on each side they are done. Put the tamales on a cooling rack before eating!

  • Pro Tip: While this is one of the tastiest ways of reheating tamale, it is also the unhealthiest. Bear this in mind if you want to cut back on unwanted fat and calories.

5. There’s Always The Microwave

If you are really feeling lazy and just want some tamales without any fuss, then there is always the microwave. Simply put your refrigerated tamales in a bowl or plate and cover it with some damp paper towels (after making sure that it is not dripping). Put the tamales in the microwave and blast it on high for about thirty seconds. Flip the tamale to the other side and replace the damp paper towel with a new one and cook it again for another thirty seconds.

If you feel that the tamales aren’t cooked enough, keep adding another 10 seconds of cooking time until they are done and ready to serve. 

  • Pro Tip: While this is certainly the easiest option, expect your tamale to be on the soggy side. The damp paper towels can help to ensure that the tamales don’t completely dry out.

Have A Fiesta In Your Kitchen!

What’s not to like about tamale? It’s convenient, has a fantastic backstory, is extremely tasty and it won’t pack on the pounds, despite being very filling. No wonder the world is crazy about this dish! So the next time you are planning to pack your lunch, think about tamale. It tastes great, and as our list shows, it is effortless to reheat!

I definitely had a blast writing this list. I not only cooked some tasty tamales, I also learned a lot about its history. Food sometimes tastes better when it has a great story accompanying it. I really hope that I’ve helped you in the kitchen today!

Did you enjoy the article today? If so, then feel free to share it with your friends and family who are also tamale crazy. And if you have any suggestions or stories about reheating this lovely dish, then please write them down in the space below. So go get your sombrero out and start cooking yourself some tasty tamales!