Are you confused about choosing the right cooking oil for your recipe? Through the years, many brands and varieties of oils have been introduced to change the way that food is cooked. Among the most popular ones are olive and canola because of their attractive heart-friendly properties. But as we all know, in cooking, there is only one oil to choose.
Though they have some similarities, these oils are different to each other in a lot of ways. Therefore, to make it less confusing, here are the best ways to differentiate between olive oil and canola oil.
As the name suggests, olive oil is extracted from olives which is why it was considered to be a fruit oil. The olives, especially ripe ones, are crushed and pressed to produce the fruit’s oil content. Generally, the process is done on cold temperatures to ensure that its nutritional integrity is intact. Thus, they are regarded as “cold pressed”.
As you may have noticed during your stroll around the grocery store, olive oils vary from one to another. You have Virgin and Extra Virgin olive oils, which differ based on the fruit-pressing process.
Extra Virgin is collected on the first press and is known to be more nutritious. Whereas, Virgin olive oil is collected on the second press. Subsequent presses undergo additional processing that produce the pure, light kinds of olive oil.
On the other hand, canola is the hybrid of a rapeseed which is why it is considered to be a vegetable oil. Unlike olive, it is processed at high temperatures. The mechanical process of manufacturing canola oil involves toxic chemicals.
So, the entire process is much more complicated than olive oil. It includes degumming, deodorizing, and bleaching, in which the oil’s impurities are further extracted. The high-temperature requirement decreases the concentrations of saturated and trans fat in the oil, and so alters its omega-3 content.
Olive oil wins the “healthier award” over canola because it has been proven to be rich in a number of nutrients.
Extra Virgin olive oil has polyphenols, antioxidants, and omega-3, which can all enhance the functions of your heart, brain, and immune system.
Hence, it prevents you from developing chronic non-communicable diseases, such as cancer, stroke, and diabetes mellitus type II.
It also contains Oleocanthal, a nutrient that imitates the action of ibuprofen in alleviating inflammation. This means it benefits people with inflammatory diseases, such as arthritis.
It also affects bone density. Osteoporosis is a condition in which the bone becomes fragile due to a decrease in bone mass. Olive oil contains a considerable amount of calcium that helps to fight osteoporosis.
Its positive effects on brain function mean that olive oil can amazingly help people to fight depression. A study showed that people who consume olive oil and polyunsaturated fats in fish tend to have lower risk of developing depression than those who consume trans fat from processed foods.
Is Canola Oil Good For Your Heart?
Even though canola oil’s content is not as healthy as olive oil’s, it still contains nutrients that are good for the heart.
In general, canola has saturated fats. When you hear the word “fats”, you might immediately believe they are bad. But here’s the catch, not all fats are bad.
There are, in fact, good ones, such as saturated fats, because they even help to lower your body’s cholesterol levels.
In addition, omega-3 and monosaturated fats are helpful in promoting your heart’s function.
So, contrary to popular belief, canola oil was proved to be safe for your health.
When Can I Choose Canola Oil Over Olive Oil?
As olive oil is healthier, it is expected that you will choose it over canola oil for the sake of maintaining your health.
But, there are times when you need canola over olive oil.
Olive oil tastes like a dressing or a dip because it tends to retain the olive fruit’s flavor when it is pressed. Therefore, it is not appropriate for baking or cooking due to the possibility that it might just end up altering the taste of your dishes.
Moneywise, canola oil is cheaper, so you’ll make more savings when you buy canola oil instead.
Hopefully, you now have an idea about what oil to put on your grocery list. But, if are you still confused about what cooking oil to use, you are free to leave your comments. We would be more than happy to help you. Also, if you also have something interesting to share about canola or olive oil, you are very welcome to share it with us!
Have you been using the same cooking oil when frying? Do you know that there are different kinds of oils that you can choose from to make your frying experience much better and healthier?
Let me introduce to you some of the choices from the vast number of cooking oils that are available on the market today. I will explain their advantages and uses to give you a hint as to what is the best oil for frying fish. So, keep reading!
First, let me say that there are four types of cooking oil that you need to always keep in your pantry. What are these oils for? When you are cooking every day, choosing can be a little mind-boggling.
Here are the four categories of oil that we commonly use and what they are best used for.
1
Olive Oil
This is praised for having the best flavor and it certainly is a regular in my pantry. It easily burns at a low heat so it is best used for recipes that do not require a high heat.
It is available everywhere and has a different range of prices, according to its brand and quality. I keep 2 kinds in my kitchen. The cheaper one is for cooking and the expensive one is reserved for making salads or recipes that do not require cooking.
2
High-Heat, Neutral Tasting Oil
These are called vegetable oils and are not to be confused with olive oil, which is a vegetable too. Technically, it means oils that have a high smoke point and a neutral taste. So, this kind of oil is recommended for recipes that require high heat and when you don’t want to taste the oil.
Vegetable oil is cheap, so great for your budget, and is best for deep-frying and baking. Examples are canola, sunflower, corn and peanut oil.
3
Coconut Oil
This is extracted from the fruit of the palm tree. It has a low smoking point and is stable at room temperature. It adds a coconut flavor to the cooked food and is the best choice for vegan groups. Best used for roasting, popcorns, sautéing and even some baking.
4
Finishing Oils
These are strong in flavor so you may like to use them for salads or to garnish your food before serving it so you can appreciate its taste. This oil will lose its flavor when it’s exposed to heat. Best for adding another flavor to a dish. Example are toasted sesame seed, herb-infused, garlic and nut oils.
What Is The Best Oil For Frying Fish?
You can cook fish in so many different ways. You need to take the utmost care during cooking since it is more delicate than other meats, like chicken, pork or beef. It easily becomes parched and tough when cooked at the wrong temperature.
The best oils for frying are those that can be used on a high heat or high “smoking point”. To cook fish right, the temperature needs to range range from 180-200 degrees Celsius.
Here is a list of the best oils for frying fish:
1
Avocado Oil
This is a high-quality oil that is recommended for healthy cooking. It is extracted from the fleshy pulp around the avocado pit and offers many health benefits. It is the newest addition to a few edible oils that do not come from seeds. However, it is expensive if you buy it in the market.
2
Extra Light Olive Oil
This type of olive oil is also labeled as “pomace” in the oil section. It has a high smoke point compared to the more expensive kind. This is a good healthy alternative when you are frying fish.
3
Safflower Oil
Another healthy type of oil that can lower your cholesterol, sugar level and improve the immune system. The market for this expensive oil is now higher than it was in the last decade.
4
Soy Bean Oil
This vegetable oil has a remarkably high smoking point and an indistinct flavor, so it’s good for frying fish. A vegetable oil that offers a lot of health benefits, it is known to take care of your heart.
5
Sunflower Oil
Because of its high smoking point, sunflower oil does not break down when it’s used at a high temperature even when you’re using it the second time around. It is best for frying fish and is a cheaper price. The downside, however, is it does not have many health benefits.
6
Grapeseed Oil
As with sunflower oil, there has been some controversy over the health benefits of grapeseed oil. This oil is one of the best cooking oils for frying because of its neutral taste and high smoking point. Use only a minimal amount.
7
Corn Oil
This is an acceptable option whose main use is for cooking. It has a high smoking point and health benefits too, as it is better at lowering cholesterol than olive oil.
How To Fry Fish
Since we are on the subject of frying fish, I might as well include some information about it for those of you who are new to this cooking method. Here is a video teaching you the right way to fry fish.
A Few Tips To Help You Get By
Use a significant amount of oil when frying so that you can maintain the hot temperature when frying.
If you have a small fryer, only cook one or two fish at a time.
If you do not have a fryer, use a deep pan or pot. Also use a frying thermometer that will show you the right time to fry the fish.
It is dangerous to use an open pot or pan to deep fry, as they may tip over and burn anybody near you. Keep children or pets away when you’re frying.
The fresher the fish, the best tasting it will be when fried.
Make sure that you have either water or fire extinguisher nearby when frying food.
It is best to put the fish in the pan when it has reached the right temperature.
Fry the fish for an average of 8 minutes (4 minutes on each side).
Drain the fish using a kitchen towel to get rid of any excess oil.
There you go, now you know how to fry fish and as well as the best oil for frying fish. I bet you’re surprised about the different kinds of cooking oil that we need to use. I was overwhelmed too and immediately stocked up on some of them in my pantry.
I hope this article has served as a good guide and shown you what oil to use when you are frying. If you think your friends will also benefit from this article, just hit share!
Sauces all over the world can be so diverse. The recipes vary from one culture, country, and person to another. If you are curious and would like to do a little research, you’ll be surprised that there are American, Italian, and Asian sauces out there.
But for now, we are going to dig deeper to find out more about two Italian sauces that are distinctive, but also alike – marinara sauce vs pizza sauce.
Marinara sauce has existed for centuries. This special classic sauce comes from the great land of Italy. It originated in Naples, which is located in the south of the country where poverty and killings are prevalent.
Marinara sauce was not created until the mid-16th century when the Spaniards introduced the tomato to Europe and the Italians quickly adopted this new ingredient.
How To Make Marinara Sauce
This recipe can serve 8 people, but if you intend to serve it to a group of people, you can change the amount of the ingredients as you wish.
Sauté the garlic and onion by reheating the olive oil over medium-high heat. The add the onions and start cooking until they are soft and translucent. This may take 7 minutes. Next, add the garlic and continue sautéing for 30 seconds or until fragrant.
Meanwhile, crush the tomatoes gently with your hands, add them with their juices to the pan of sautéed onions. While cooking, continuously pound them against the sides using a spatula. If you think this procedure is kind of messy, you can use kitchen scissors instead to cut the tomatoes while they are cooking in the pan.
Next add the salt, bay leaf, and herbs, such as thyme and oregano, and then the tomato sauce. You can add the basil once the sauce is cooked.
Simmer the sauce rapidly for about 20 minutes, then gradually lower the heat to medium-low, and continue to simmer until the sauce thickens.
Once cooked, remove the sauce from the heat. You can serve this with a pasta or even use as a pizza topping.
If you desire, you can try including some balsamic vinegar or red wine, and add a few veggies, onions, mushrooms or ground beef.
Pizza Sauce
Although they may seem to be interchangeable, both marinara and pizza sauces are comparable, as they both offer a lot of variety.
Pizza is a very classic favorite loved by everyone of all ages. Whether it is spicy or not, topped with 4, 5 or 6 kinds of cheese, and cooked with garlic and onions or not, pizza sauce is always a perfect match that will make your day extra special.
It is all about the spices; they make a huge difference.
What’s The Difference?
There are two types of pizza lovers in this world: those who prefer the double-concentration of marinara and those who prefer pizza sauce on their pizzas.
If you are going to ask me if there’s a difference between the two, then I would say there is, but on the other hand, there’s none. Sounds confusing, right? If pizza sauce is the one you automatically use to top a pizza, does it mean that marinara sauce is used for marinara pie? No, as there’s no such thing. The fact is, both of them are perfect as pizza toppings.
Some people choose marinara as a topping because they find a double-concentrated tomato puree tastes better when partnered with dough. This type of puree is available all over the world and provides not only the fresh taste of tomatoes, but maintains the taste of the other toppings. And for the record, cooking is not needed.
Via Baking Steel
On the other hand, some people prefer pizza sauce as it can boost other types of flavor. The US is obsessed with experimenting with spices. They generally believe that the more spices, the tastier it is, which is why such creative and specially prepared pizza sauces can be found in the market.
What matters most in the end is the taste. As long as it satisfies your palate, then it deserves an A+ grade. The best sauce award entirely depends on you. So, are you team marinara sauce or pizza sauce? You decide.
Tell us your thoughts! Please send your comments, suggestions, personal insights and experiences of these two Italian sauces.
There is nothing more boring than eating food that has the same flavor almost every day. Peanut butter is a versatile delicacy. You can use it as a dessert, spread, sauce or blend it with your favorite dishes. How frequently do you use peanut butter every week?
Are you tired of it and desperately looking for something new to spice up your snacks? Let’s give it a twist by making it fiery hot as well as creamy sweet. It’s going to have a real kick to it!
Peanut butter is a food paste or spread that’s made out of ground roasted peanuts, mixed with salt and sweeteners. You can make it in a way that’s completely different to kind sold in supermarkets. It’s awesomely unique!
Let’s make our own spicy peanut butter that’s perfect and satisfying!
What You Will Need
1/2 kilogram of salted, well-roasted peanuts.
4 tablespoon of peanut oil (or any oil that you have available).
A teaspoon of smoked paprika.
½ a teaspoon Kashmiri chili (which you can find in any Indian grocers).
I make this peanut butter for grown-ups only. I don’t know how many kids can take the spicy taste, but I wouldn’t recommend it.
1. We’re going to make two batches of ground peanut butter. So split your roasted peanuts into two before loading them into the food processor.
2. Pour the first half of your roasted peanuts in and blitz them long enough until you reach the desired fineness.
3. Tip the ground peanuts and pour them into a bowl.
4. Get the other half of the roasted peanuts and pour them into the food processor with the oil, paprika, and chili. Pulse for 4-5 minutes until they reach the desired smoothness.
5. Add your freshly ground peanut butter into the crunchy peanuts in the bowl. Use your spatula to get it all out from the processor. Mix it well and pour it into your prepared glass or plastic container. Seal it tight and store in your pantry.
Use it when you need it. Enjoy!
If you want your peanuts to be roasted a little bit darker, you can roast them again yourself. Heat your oven to around 170 degrees C and bake them. Check them out every 10 minutes and shake. See if they are as dark as you want them to be.
You’re free to make your own spicy version. There is no limit to how creative you can be. Here is a video on how to make spicy peanut butter. Enjoy watching it!
Now that we’ve made our spicy peanut butter, let’s make use of it in the right away. Are you ready to make spicy peanut butter sauce?
How To Make Spicy Peanut Butter Sauce
Peanut butter sauce is very useful as you can put in a salad or any other dish, which will spice up your cooking adventure.
What You Will Need
½ a cup of your homemade spicy peanut butter.
½ cup of your favorite soy sauce.
4 cloves of garlic, chopped into bits.
¼ of a cup sweetener, preferably honey.
2 tbsps. of wine vinegar (I’m using rice wine).
2 tbsps. of any kind of oil (I’m using sesame).
2 tbsps. of Asian hot chili sauce.
1 tbsp. of freshly sliced ginger.
¼ tsp. of freshly ground red pepper.
½ of cold water.
Food processor or grinder.
Bowl.
Spatula for mixing and scraping.
Container for storage.
How To Make It?
Put all the ingredients into the food processor and pulse it for a few seconds or until it’s well blended. See if the sauce is the right consistency. If not, process it again.
Store it in your prepared container. It’s now ready for use!
Some Tips You Can Use
Did you realize this can be made into a sauce in just 3 simple steps? Dump the ingredients in the processor, pulse, and then store. Here are some other useful tips for you:
You can make your sauce three days in advance and then put it in a bowl, cover, and store in the fridge. Let it stay at room temperature first, before using.
It’s best to use fresh peanuts and roast them yourself to get the exact roasting that you like. Fresh peanuts are much sweeter than those in the supermarket.
Don’t limit yourself by just using these recipes – make your own ones by picking, mixing and blending!
Here is a video that shows you how to use spice peanut butter sauce in a sweet potato noodle bowl recipe. Sadly, a ready-made spicy peanut butter was used, but we can always use our homemade version. Look how tasty this recipe can be!
Spicy peanut butter is so versatile, there are tons of recipes out there waiting for you to make. You can use it as a bread spread, fruit dip, spicy appetizer and spicy dessert, as well as a sauce.
What’s your style of spicy peanut butter? You can use different kinds of chili whole or ground, paprika, or hot sauces. In fact, anything that will make your mix really hot!
I wonder how spicy your version is? Please share it with us. If you have found our article fun today, just click like and share it. This is a dare – so the heat is on!
Waffle fries! These fries are in the shape of very delicious, crispy, golden brown waffles. They are yummy enough to get your children running from their rooms. It’s a crispy snack that will make your family, relatives, and party members say “YUM” when the plate is empty! Dip them with ketchup, salt or anything else that you like!
What are waffle fries made of? They are made out of fresh potatoes and a little sprinkle of whatever you like. It’s a simple recipe that makes a yummy meal. Slice and shape them, deep fry them, and cool them down. It’s as simple as that!
If you think making waffle fries is hard, you are wrong. It is easy! Once you know how to make them, you can have as many as you want, every day, without any fuss. You can even teach others how to do it! Especially your kids!
Share them by making a hearty meal for your family, friends or special guests, and enjoy each fry to your heart’s content.
Searching for the right ingredients at the groceries can be like trying to find your way through a maze, especially if you are in a hurry.
Thankfully, you will not really need to get much stuff with this recipe, as all you really need is a Patata (potato) or a whole bunch of them if you want to make a lot of waffle fries. The ingredients are just potato, oil and some flavoring that you like.
Tip: To make your waffle fries taste better, always choose the freshest and best looking potatoes. Rotten ones will, of course, upset your stomach.
2
STEP #2 – WASH THEM WELL
Scrub your potatoes well, especially if you are going to keep the skin on. Who knows what bacteria could be on them. Do not use soap, however, water will do.
Tip: Soak the potatoes with cold water first to prevent them from turning brown while you prepare the pan or deep fat fryer.
3
STEP #3 – SLICE AND DICE THE POTATOES UNTIL THEY LOOK RIGHT
To make the perfect shape, you are going to need a “crinkle cutter” as this device makes the cutting much easier. If you do not have one, do not fret! They are very affordable.
However, if you have a vegetable chopper, it is a lot easier and faster.
Slice the potato downwards and rotate it 90 degrees before you make each slice.
Keep on doing this until you used to it and become very good at cutting. Make sure that they’re evenly cut and the perfect shape and size. It’s your choice whether you want them the fries big or small (Medium is advised though).
4
STEP #4 – COOK THEM TO YOUR HEART’S CONTENT
After carefully slicing the potatoes, deep-fry them using a deep fryer. It is very simple.
Add oil (it should be poured up to 375 degrees to let the fries soak).
Then carefully put the fries into the deep fryer! If you do not have one, use a pot and put the fries in carefully, so that the oil does not spill all over the place.
Cook them for at least 5 minutes until they are a delicious golden brown color. This tells you that they are done and ready to eat.
5
STEP #5 – LET THEM BE COOL JUST LIKE YOU
When you have finished frying, put the golden brown waffle fries on the baking pan! If you do not have one, use a plate or tray. Place some paper towels on the pan and drain the oil at the same time.
If you want to add some seasoning or spice, now’s the time to do it!
6
STEP #6 – ADD THE SEASONING OF YOUR CHOICE
Once the freshly fried potatoes have cooled down, add the seasoning of your choice, if you want to. It’s okay not to add any at all or just put some ketchup on top of the fries.
Below are some suggestions that the kids will love:
Cheese powder or freshly grated cheese.
Chicken gravy (yep, they love it!).
Mayonnaise.
Ready mix tortilla dips.
Tips:
Spicy beer mustard, Queso Fundido al Tequila, Espresso barbeque sauce, and Tangy ranch dip duo are all good dips for your waffle fries. If you don’t have any of them, or think they are too much, Ketchup is another suggestion.
Onion powder, Cajun seasonings and fresh garlic are some seasonings that make waffle fries even yummier. But don’t overdo it or they will taste too very, very bad.
7
STEP #7 – GET READY TO ENJOY YOUR FRIES!!!
This is the favorite step of all! Are you ready to taste your fresh brown fries?
Here are some secrets for tasty and crispy waffle fries:
It’s all in the oil! You can choose any oil you like. But make sure it is oil that has been continuously used for a while. Do not use oil that’s either new or old.
Freeze the sliced potatoes first, allowing the moisture to break out, as this results in crispier fries.
Fry them twice. Half cook them the first time at a lower temperature, and then fry them again at 350 degrees F until they are cooked. They will be creamy inside and crispy outside, as a result.
Well, anyway guys, the secrets I have given above are a compilation of tips from restaurant chefs who have tried and tested many recipes for waffle fries. Following these professional tips is sure to be a step forward that will improve your cooking.
So how are your waffle fries? Taste them to find out and make sure you enjoy this lovingly prepared delicious homemade meal! Did you enjoy our simple waffle fries tutorial? This recipe is so simple you can serve it as often as you like for your kids and guests.
After all, who doesn’t love fries? We’d love to hear all of your valuable opinions and comments!
Most of us just love bacon. Even if you don’t admit it openly, you know that your stomach always craves this delicacy. It is just an irresistible treat that you cannot ignore. But things would be better if you had the best bacon cooker. It makes preparing bacon a lot faster, easier and healthier.
It has an ergonomic design that ensures the bacon strips are evenly cooked. It is a great tool to use with your toaster (check out our reviews for the best 4-slice and 2-slice toasters). With these kitchen appliances, your morning breakfast will always be perfect and full of flavor!
In this article, we featured five of the most impressive options for a bacon cooker on the market today. Moreover, we include a buyer’s guide to make sure you won’t get lost when shopping for this product. So what are you waiting for? Read on!
There are dozens of bacon cookers on the market today, but these five were the ones most able to satisfy our needs. Each of them has a good standing in the cooking community. Find out what makes these tools tick by reading our reviews. Read on!
The 5 Best Bacon Cookers On The Market Today: Our Reviews
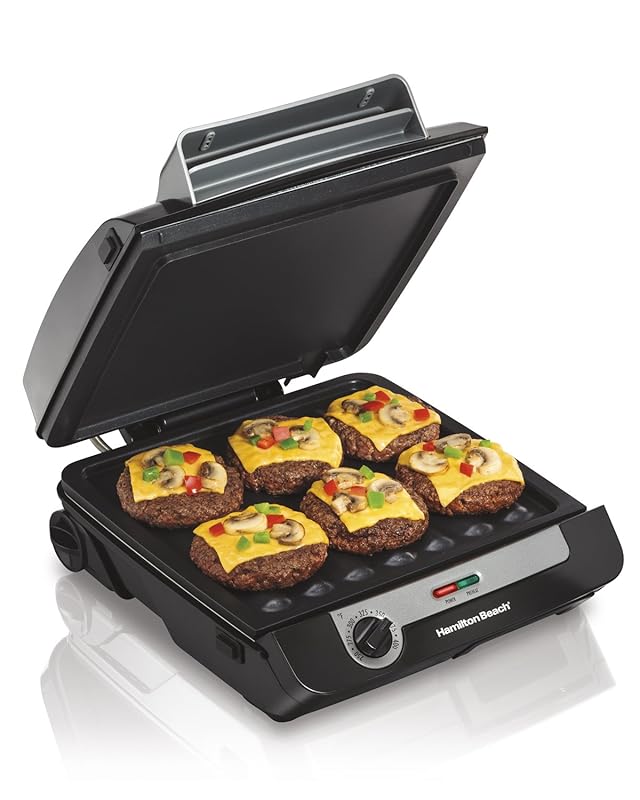
1. Hamilton Beach 3-in-1 MultiGrill
Image from Amazon.com
This is one of the most impressive bacon cookers we encountered. It is perfect for both outdoor and indoor cooking, thanks to its portable, lightweight design, and has a wide cooking area (around 100 square inches). Better still, it is non-stick. So you can easily remove the bacon without getting any stuck on the device.
The cooking surface is pretty flat and even. This construction allows you to do a combination or griddle and grill. Moreover, you can cook the bacon crisply without splattering, as it has an innovative kickstand that stands upright to stop the cooker from getting greasy.
You will also love the removable cooking plates, which makes the cooking a lot more convenient. The same is true of the drip tray – you just remove it from the device and wash it. Trust us, all of these parts are dishwasher safe, so there is nothing to worry about.
Pros
Cooks the bacon evenly.
Non-stick surface.
Most parts are removable and dishwasher safe.
Pretty wide cooking surface.
Compact and durable construction.
Cons
Short power cord.
Its LED indicators aren’t that bright.
See More Details
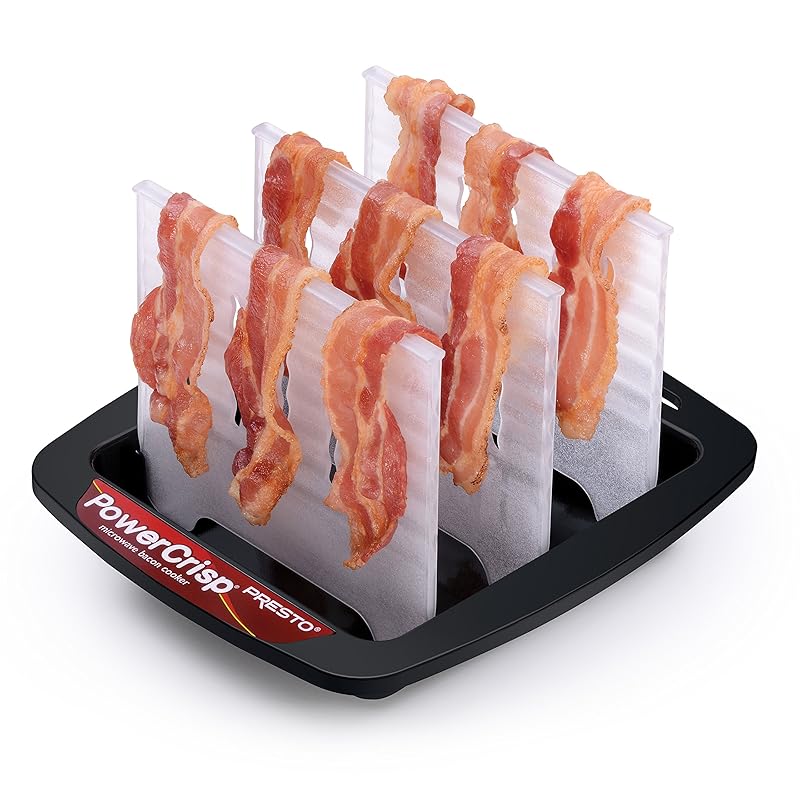
2. Presto Bacon Microwave Cooker
Image from Amazon.com
If you are looking for a basic bacon cooker, then one of our favorite recommendations is the Presto Bacon Microwave Cooker. It has a simple design and easy operation that allows you to use it easily. You just put on the bacon and wait for it to be cooked!
In just a single go, it can cook up to twelve rashers of bacon, and it doesn’t produce unwanted splatters on your stovetop, so cooking remains smooth and clutter-free. This bacon cooker prepares your delicacy in a safer and healthier manner than pan-frying, as the excess fats fall into the base of the tray.
Cleaning is not too tricky as this bacon cooker is fully submersible in the water and dishwasher safe. It doesn’t have awkward, hard-to-reach parts either, and it is easy to store. All of its cooking racks are removable.
Pros
Removable cooking racks.
Fully submersible in water.
Cooks cleanly (no splatters).
Easy to use.
All the dripping fats falls into the base of the cooker.
Cons
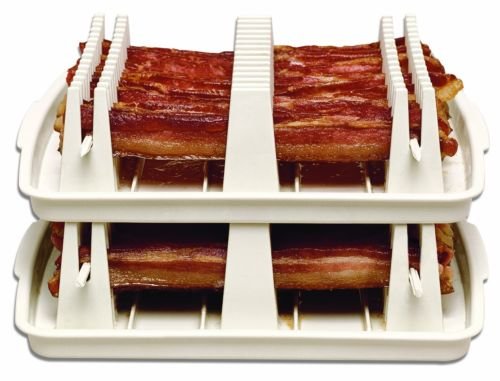
3. Emson Bacon Wave Microwave Bacon Cooker
Image from Amazon.com
This is another excellent option for a bacon cooker. It has a good reputation in the community, thanks to the high-quality construction. The cooking racks are elevated, so the grease easily drips from the bacon, which means you can cook your favorite delicacy healthily.
The Emson Bacon Wave’s structure is truly ergonomic and rugged. The materials don’t feel cheap and flimsy at all, and it has a premium feel considering its price. It can cook all your bacon evenly and reduces the cholesterol and fat content of the meat.
This bacon cooker has a stackable design, which means it has the capacity to cook a maximum of twenty-eight bacon rashes in one go, and the cooking time is pretty fast.
Pros
Cooks one rasher of bacon per minute.
Removes unwanted fat and cholesterol.
Guaranteed no grease.
Easy to clean.
Comes with a stackable design.
Cons
It isn’t long enough to handle lengthy bacon rashes.
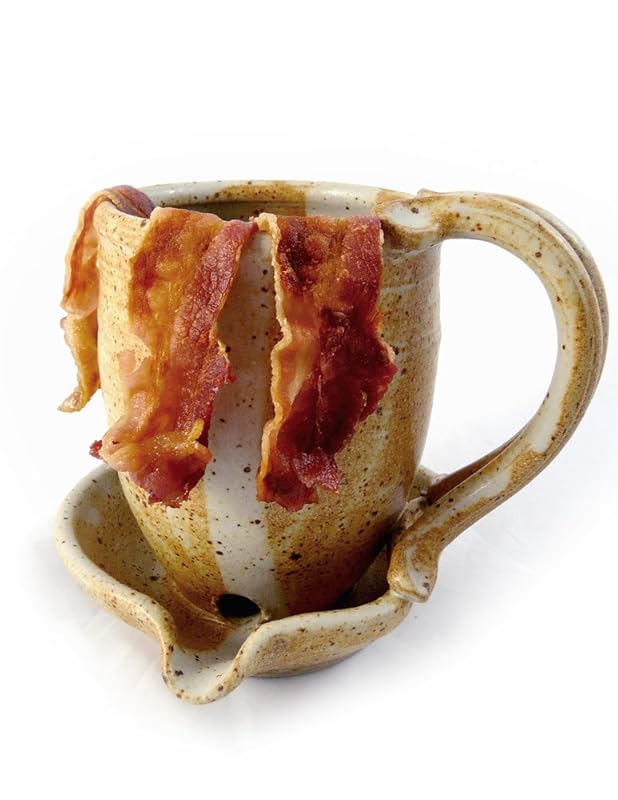
Unlike most of the products featured here, this unique design has a handcrafted mug design. It is a genuine pottery product and there’s no trace of lead, so it’s safe for cooking.
This particular bacon cooker is quick and easy. It can fry without any residues of grease or oil. Just drape the bacon on the rim of this mug, then cover it with a paper towel. After that, put it inside the microwave and wait for four minutes. By just following these simple steps, you can serve crispy, perfectly cooked bacon all the time!
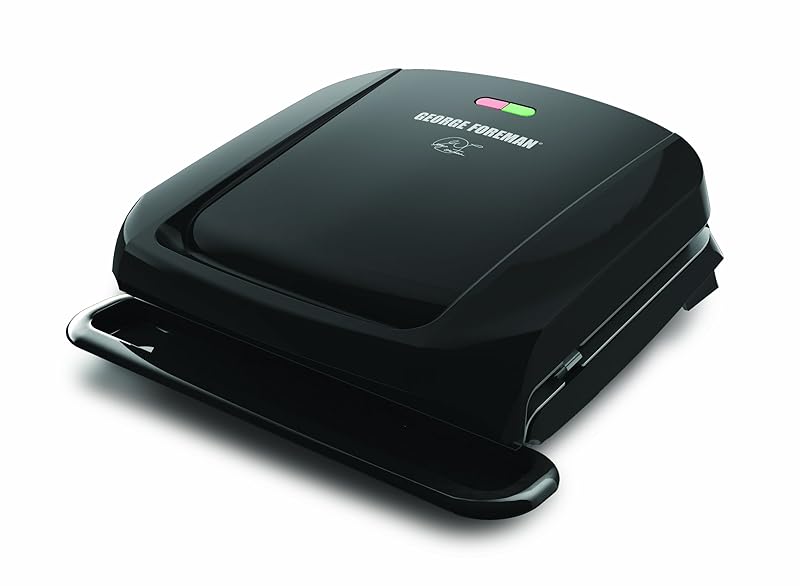
5. George Foreman 4 Serving Removable Plate Grill
Image from Amazon.com
Pros
It cooks evenly.
Eliminates the grease from frying.
It’s compact, so it can fit perfectly inside your microwave.
Doesn’t contain any harmful chemicals.
Dishwasher and microwave safe.
Cons
It can only prepare eight bacon rashes of bacon at one time.
Image from Amazon.com
If you want an innovative way to cook your bacon, pick the George Foreman Removable Plate Grill. It has an indoor grill dedicated to cooking bacon and other related servings. It is perfect for bacon because of is its fat-removal design. The cooking surface of this device is partially sloped, so the grill can effectively remove up to 40% of the fat. As a result, your meat becomes leaner and healthier than ever.
The grilling surface has a non-stick coating, which enables a mess-free cooking, so you don’t need to apply butter or oil. The coating enhances the durability of the cooking surface, and this is something you won’t see on the other regular indoor grills.
Pros
Precise and even bacon preparation.
Removes excess fat and oil.
It has a non-stick coating that eliminates the need for butter and oil.
Durable and ergonomic construction.
It has an adjustable floating hinge.
Cons
Only comes with one heating option.
The grilling surface is quite small.
Things To Consider Before Buying A Bacon Cooker
Now we have introduced our recommended brands, it is time to discuss some of the things you’ll need to consider before choosing one. Many of you will be curious about the very nature of a bacon cooker, and even if you are not, we encourage you to find out more about this device so that you can buy a product that’s worth your money.
Do You Really Need A Bacon Cooker
Some people think that a bacon cooker is not a necessary tool. We wouldn’t blame them, as you can always use the traditional method of frying bacon in a pan. But traditionals are not meant to last too long, and pan-frying is not always the best choice.
It is Safe
Let’s be straight with you. Frying can be an unhealthy way to cook your bacon. There are two reasons for this.
Firstly, frying doesn’t remove the unwanted fat and cholesterol in the meat.
Secondly, the cooking oil could become a recipe for danger. Just imagine all the fatalities and illnesses that have been caused by grease and oil.
We are not scaring you, we are just stating the facts. Yes. Pan-frying is the basic way of preparing bacon, but it doesn’t mean that it’s the best. Furthermore, we can guarantee that it is not the safest option for you.
Simplicity
Bacon cookers are a necessary invention, but there is nothing really sophisticated about the device. In fact, it is just a simple assistive tool for preparing bacon. The device’s rack system means you can cook several bacon strips at the same time. It isn’t a cooking mechanism on its own as you need to insert it into an oven or a microwave.
There is no need for oil and you can be sure all the excess fat and cholesterol will dry out. It is a simple cooking procedure since there is no need to pay attention to the bacon. Just shove the bacon cooker on and your job is already done!
How To Choose A Bacon Cooker
As this isn’t a complex mechanism, there are only a few things you should pay attention to when shopping for the product. They are:
Grill or Cooking Racks
There are two options to choose from.
The first is the bacon grill, which effectively removes the fat and oil from the bacon. This device usually runs on electricity, so there is no need for assistance from your microwave or oven.
The other option is the cooking rack, which is the standard construction of the bacon cooker. It is a simple tool with a series of slots for the bacon rashers. This is just an assistive device, so you will definitely need a microwave to cook the bacon, and it is much cheaper than the bacon grill.
Construction
You should always pay attention to the quality of the bacon cooker’s construction. If you are buying a cooking tray, make sure that its body is sturdy enough to handle the heat inside the microwave, and don’t choose one that breaks or dents easily as it is potentially dangerous.
You should also check if the material is free from BPAs and other harmful chemicals. With any kitchen amenity, always take the time to find out if it’s passed the quality control standards. If it hasn’t, then do not buy it.
Capacity
Not all bacon cookers have the same capacity. Some can handle eight bacon strips in one go. Others use a stacking system so that they can cook up to thirty pieces of bacon at one time.
Always bear in mind how many people you are going to feed. Just ask yourself, if you are alone or living with your family? Just answer this question and you will quickly know which model you should choose.
Size
The size is also an important factor in choosing a bacon cooker. Will it fit in your oven or just become a nuisance? Again, you are the only one who can answer this question.
We are hoping that this article has helped you to decide which bacon cooker to choose, or has convinced you to get one in future. We are not doing this for profit. At the end of the day, it is your prerogative if you are going to buy or not. From our end, just want to share information about the convenience and benefits that a bacon cooker provides.
Our Best Picks
After looking at all the featured products, we deem that the Emson Bacon Wave Microwave Bacon Cooker is the best bacon cooker. It has a simple design that can cater for the needs of most household sizes. It is pretty durable and ergonomic as well. The fact that it prepares bacon quickly and healthily has convinced us that this is the best bacon cooker you can get!
Did you learn from this article? Did we miss out a bacon cooker that’s worthy of being mentioned? If so, tell us all about it in the comment section below!
Are you a pasta lover? Pasta is an old favorite for everyone. There are hundreds of cooking variations all over the world that use different kinds of pasta, as well as methods of cooking, taste, and style. You are about to learn about the most popular pasta recipe. It’s enjoyed by old and young, on both special and ordinary days, and has survived the test of time.
In this Ultimate Guideline to Cooking Delicious Mac and Cheese, you will not only find out how to cook it, but also where it originated from.
The Ultimate Guide To Cooking Delicious Mac And Cheese
Mac and Cheese is a combination of pasta, cheese and cream that is an all season favorite for everyone. How can you go wrong with Mac and Cheese? As long as you have these three major ingredients, you can cook the way you want. Considered to be a housewives’ best friend, it’s a hearty meal for all the family.
Needless to say, it is the most popular classic dish in America. Why else would they celebrate National Mac and Cheese Day every July 14th? On this day you have the chance to share your own Mac and Cheese recipe with fellow Americans.
Here is a funny video on how some of the Americans celebrate Mac and Cheese day!
1. The History Of Mac And Cheese
The name Macaroni and Cheese is usually associated with the Americans. It is one of their classic comfort foods that is welcomed anywhere, whenever. But did it really originate from them?
Pasta with cheese recipes have been popular since the 14th century when they were recorded in cookbooks. Since then it has been a regular in households and often cooked for gatherings. The first recipe ever recorded for Mac and Cheese was from Liber the Coquina and Forme of Cury, which described it as a “mixture of pastry dough, cheese, and butter”. We give our gratitude to these classic food lovers, as Mac and Cheese has now been accepted in all Europe.
Although we never really did find out who made the macaroni pasta that’s used in the dish there’s been speculation that the recipe was introduced to Thomas Jefferson. He loved it so much he brought a pasta-making machine back from Italy. So we can guess that Mac and Cheese conquered America during that timeframe.
2. What Are The Major Ingredients Of Mac And Cheese Recipe?
As mentioned before, the basic ingredients are pasta, cheese, and butter or cream. Popular recipes for it will be featured later as we go along, but you will now be wondering what kind of pasta can be used.
There is no historical record of who first thought of using macaroni in this recipe. Before macaroni, it was only mentioned as pasta. It is currently popular to use macaroni, the pasta the dish was named after, but people are adventurous and try other cheeses. Whatever pasta is used, however, it’s still the same yummy Mac and Cheese miracle.
3. The Different Kinds Of Pasta That Are Perfect For Mac And Cheese
Before finding out the different types of pasta, watch this video to find out how pasta is made:
1. Shells – Use the same cooking method. It takes the same amount of time as macaroni, so it is the best alternative for this recipe. It has a more stylish appearance than macaroni and has shell shaped cups with corrugated backs and hollow interiors that capture plenty of the creamy sauce.
2. Elbows – This type of pasta is taken from the macaroni name, and is the original and most popular to use. It cooks pretty fast, and its pasta design is arced and tube-like perfect for capturing the creamy sauce.
3. Farfalle – Known as the “bow tie” or “butterfly” pasta, it is great for classy Mac and Cheese recipes, since it’s wide and flat surface provides a nice touch for herbs, veggies, and other cooking add-ins.
4. Penne – It is recommended that you use larger pasta that is fulfilling to the last bite and retains its texture after baking.
5. Pasta that is also suitable, but not widely used:
Rotini
Cavatappi/Cellentani
Campanelle
To have a design that captures and holds the delicious creamy sauce.
A niche, unique design that it is eye-catching at gatherings and food presentations.
Cooks fast and easily, absorbs the sauce’s creamy taste and retains its texture.
You may have kept stocks of ready mix Mac and Cheese in your cupboard to satisfy your immediate cravings, but making Mac and Cheese from scratch tastes much better than any meal in a box.
Before you try a different kind of cheese, let’s find out how cheese is made. Here is an educational video on how to manufacture it.
4. The Different Cheeses Generally Used In Mac And Cheese
1. Parmesan Cheese – This is for a full serving of super creamy Mac and Cheese. Roughly rigid in the surface, it tastes sweet and tangy and is often credited as one of the top cheeses in the culinary world.
2. Feta Cheese – This crumbly cheese is best for a Mac and Cheese with white sauce, and it’s best cooked with cheddar. A brined cheese, it is made out of sheep’s milk or a combination of goat’s and sheep’s milk.
3. Pepper Jack – The true American cheese, this is spiced with sweet peppers and herbs that give an extra twist. Its spicy but creamy taste lingers on your palate.
4. Cheddar Cheese – If you just can’t afford to mess things up, just choose cheddar. It goes well with almost anything! Made out of cow’s milk, it is the most common cheese used and is both sturdy and natural on the surface.
5. Cottage Cheese – Want a creamier Mac and Cheese? If so, a combination of cottage and cheddar cheese will get you the texture you desire. Take it from a soft, white, creamy fresh cheese.
6. Cream Cheese – Soft and mild to the taste, this fresh cheese is made out of milk and cream. When making Mac and Cheese, combine this with Mozzarella and Parmesan.
If you have been wondering what the differences are between all of the existing types of cheese, here is an educational video explaining the classification of cheese:
Remember, it is the sauce that makes this dish tasty. So, what’s in the sauce? The cheese, of course. For a perfect tasting Mac and Cheese, blend one sharp cheese and two melting kinds of cheese. If you do this, you will never go wrong.
The Different Methods Of Making Mac And Cheese
Way back in time, Mac and Cheese was originally baked. It would have stayed the same if not for of mankind’s creativity in the art of cooking. But now, you can make Mac and Cheese in any way you please. Which method is yours?
1. Stovetop Mac And Cheese
Some people do not have the luxury of an oven. But people easily adjust by cooking Mac and Cheese with the tools they already have in their kitchen. What can stop you from eating one? You can cook your pasta mixture on your stovetop using your skillet. It is still the same dish, pasta and cheese/cream sauce cooked together, and results in a sumptuous Mac and Cheese meal.
Here is a video on how to cook Mac and Cheese using the stovetop method:
2. Oven-Baked Mac And Cheese
Baking was the original way of cooking Mac and Cheese and is the easiest method. All you have to do is mix the ingredients, put it inside a baking pan, place it in the oven, set the time and wait. When the time is up, it is ready to eat. No sweat!
However, every baked Mac and Cheese has to be cooked on either the stovetop or deep fried during the cooking of the pasta and sauce.
Here is a video showing how to cook Mac and Cheese using the baking method:
3. Deep-Fried Mac And Cheese
The deep-fry method uses the deep-fryer instead of a skillet. This requires a lot of oil compared to frying pans/skillet. These are usually applicable to Mac and Cheese balls recipes.
Here is the video showing you how to cook Mac and Cheese by using a deep-fryer:
4. Cooking Mac And Cheese Using The Slow Cooker Or Crockpot
Using the slow cooker when making Mac and Cheese is simpler and a lot easier compared to the baking method. With a slow cooker, you do not need a baking pan. You can choose whatever you want to use, either the slow cooker or the crockpot. The result will still be the same with either of the two.
Just mix your ingredients right inside the slow cooker (you don’t need to cook the pasta ahead), when it’s done, cover the lid, turn on the slow cooker and set the time. When the time is up, it is ready to eat. Hah! You can even eat it right from the slow cooker itself!
Here is a video showing you how to cook Mac and Cheese by using the slow cooker:
Advantages and Disadvantages of the Different Cooking Methods
The methods of making Mac and Cheese without using an oven are called “no bake” Mac and Cheese recipes. Among the four different methods used, which one are you fond of? If you have not decided yet, here are the advantage and disadvantages of each method.
Cooking Method
Advantages
Disadvantages
Oven Top – The best method in terms of saving time
Quick cooking – an average of 15 minutes.
Less oil used.
Best for sauce consistency.
You have to cook hands-on until it’s done.
Oven Baked
Easy to cook, just place inside the oven, set the timer and leave.
You need to pre-cook the sauce in a skillet.
You are going to use a lot of containers, so there’s a lot to wash.
Cooking time is longer as you need to do the skillet first before baking.
You need to use oil in the skillet and grease the baking pan.
It often ends up a dry Mac and Cheese.
Deep Fried
Best for bite-size Mac and Cheese recipes.
Too much oil is needed.
It takes longer to cook since a lot of oil means longer heating.
You need to chill the pasta mix first before frying it.
2 processes are needed – chilling and deep-frying
Slow Cooker – The best method in terms of less effort
Fewer utensils to wash. Mix the pasta inside the slow cooker and cook right away.
Less processing time is needed (there’s no need to cook the pasta ahead).
You can leave the pasta that’s left inside the slow cooker, cover and reheat later.
Once you’ve done mixing the pasta, cook inside the rice cooker, set the timer and leave.
No need to use oil, just grease the slow cooker pot.
Even though the pre-cooking processing time is reduced tremendously, it is still a slow cooker, so it takes a very long time to cook.
The result is surprising really. Oven baking is usually the preference when cooking Mac and Cheese, but if you looking at the table above, you’ll see that the slow cooker is the winner for needing less effort and the oven top for saving time.
What do you think about the above result? Needless to say, whatever the advantages and disadvantages are, Mac and Cheese will always be heavenly delicious. Which method do you prefer now?
Common Mac And Cheese Cooking Mistakes And How To Avoid Them
It does not matter how old this recipe is, practice makes perfect. As you are cooking Mac and Cheese for the very first time, these common mistakes might apply to you.
1. Where’s The Sauce? Dry Mac And Cheese
This is the worst mistake of all. Mac and Cheese should be creamy and ooze with a tasty sauce. Who wants it dry? However much time, effort, and expensive ingredients you just poured in, a dry Mac and Cheese will be ignored.
How to avoid making a dry Mac and Cheese?
Use the stove top method, which is best for retaining the consistency of the sauce.
Do not make the sauce too thick or there won’t be enough sauce when the cooking is done. The pasta will absorb it all.
Always make extra sauce. If you notice it is drying up quickly during the process, add extra sauce!
Stick to the times we’ve given as overcooking will mean your Mac and Cheese dries up or gets burnt.
Try adding pasta by portions. When you have reached the desired consistency of the sauce, stop adding the remaining pasta and set it aside for later or the next time you cook.
2. Yummy To The Eye But Tasteless
Looking at this dish can make your mouth water, but it would be devastating if it proved completely flavorless. That would be an epic fail to the palate!
How to avoid making a flavorless Mac and Cheese
Use the correct blend of cheeses. You can use the best-tasting cheese (sharp) or mix the sharp with the mild, and then test it.
If you have a cheese shortage, you will need to add enough cheese to reach the desired taste.
Add garlic and your other favorite spices to the ingredients, and let the spices do their magic!
Try to adjust the amount of salt and pepper.
Use fresh herbs, not dried ones.
A little twist won’t do any harm, so add some hot sauce if you prefer.
3. What Cheese Do You Use? It’s Not Cheesy Enough!
This could be another reason why it is flavorless. So mistake #2 is related to this. Of course, it has something to do with cheese.
So how do you fix it?
Try to experiment – three types of cheese make a yummy Mac and Cheese. Look for one sharp and two that melt easily.
You’ve got to test taste while mixing the sauce. If you think it needs more cheese, then add more before it’s too late.
Always choose the best quality cheese – ask the experts what they use.
4. Overcooked Pasta
A creamy Mac and Cheese is yummy to the last bite, and there’s nothing better than firm pasta to hold the sauce and maintain its texture. But soggy pasta will make you lose your appetite.
How to avoid soggy pasta
Follow the instructions while cooking the pasta and master the al dente goodness of cooked pasta.
Test the pasta from time to time while boiling the pasta and make sure it is isn’t overcooked.
If you plan to bake the pasta afterward, only half cook the pasta while boiling it. Then it will cook perfectly in the oven.
5. Watery Sauce
Where did the creaminess go? If it’s watery it will be tasteless and you’ll be wondering if you are you eating Mac and Cheese or sipping soup.
How to avoid watery sauce
Mind how much liquid you put in it. If you put more than what’s needed, you will make your Mac and Cheese too watery and the pasta soggy. It will affect the taste too. So add the liquid gradually.
If you think you’ve added more liquid than necessary, add more cheese to make it consistent.
If you cooked it on the stovetop, bake it for another few minutes to reduce the liquid.
If you baked Mac and Cheese turns out watery from the oven, let it set for a few minutes and the texture will change.
6. Choosing The Wrong Pasta
As you learned in the first part of the article, certain types of pasta are perfect for Mac and Cheese. Stick to this list and it will end up just fine. Mac and Cheese pasta should be thick, firm, and must have those grooves and hollow designs to hold the creaminess of the sauce.
7. Grainy Cheese Sauce
Losing the smooth texture of the cheese sauce has a big negative impact on the quality of the taste. The sauce should be creamy, smooth, and tasty. If the sauce is grainy, the taste will never be the same.
How to avoid grainy cheese sauce?
Combine the right kind of cheeses. If you have chosen more sharp cheese than soft kind, it will end up grainy. Try to see our cheese list on top for the guide. Remember one sharp, 2 soft cheese blend.
8. Separation Of The Sauce When Cooking
It’s very frustrating when you see the sauce separate during cooking. It needs more effort to fix it. Try and find out how to balance it.
Make sure you balance the number of ingredients when cooking white sauce. Add all of them gradually while continually whisking the sauce until it thickens.
9. Oily Mac And Cheese
Who likes greasy Mac and Cheese? This is worse than watery sauce. Oil is the last thing you need in your bowl.
How do you avoid this oily sauce texture?
Do not overcook or overheat the cheese and this is will lead to the fat separating from the cheese, which creates the oily sauce.
10. My Mac And Cheese Crust Tastes Bad
The brown crust on top of Mac and Cheese, which is a combination of the sauce and breadcrumbs, makes it more deliciously inviting. Your mouth will water knowing the brown crust is a combination of the sauce and breadcrumbs that’s been perfectly cooked.
How do you get that perfect brown crust of Mac and Cheese and not the burnt, bad tasting one?
A simple trick will do. Usually, the crust burns if it’s been exposed to heat for too long. Try baking the Mac and Cheese without your toppings first and then, when it is halfway, add the toppings so that they cook in half of the time. It will not get burned and turn out to be the delicious brown crust you want it to be.
That should sum up all the common Mac and Cheese failures nearly everyone has experienced while trying to make the perfect tasty dish. But don’t worry, when you finally get it right, you will be able to eat it whenever you want.
Mac And Cheese & Health
Mac and Cheese recipes are delicious but let’s look at how nutritious it is. Is the dish as nutritious as it is yummy? It is a favorite for both the old and young generations alike, so let us see how healthy it is for our bodies.
1. The Health Benefits Of Mac And Cheese
The macaroni pasta that is usually used does not really have a high source of fiber and other nutrients. Replacing it with the wholewheat pasta version will do the trick though. Obviously, cheese has lots of health benefits for the human body.
Let’s focus on these two major ingredients and see what we can get:
Fiber – prevents constipation, heart diseases and type 2 diabetes.
Iron – enable the production of hemoglobin and plays a great role in the immune system and cell growth.
Phosphorus – promotes healthy skin, nerves, and digestion.
Zinc – is great for cell division, the immune system and the fast healing of wounds.
Other nutrients, like calcium, which strengthen the bones and teeth.
Potassium – this reduces the risk of high blood pressure and promotes muscle health.
Folate and vitamin B – prevent birth defects.
Protein – needed for bodybuilding.
Vitamin A – maintains healthy vision and contains antioxidants.
2. The Nutritional Controversy Surrounding Mac And Cheese
This controversy boils down to the Kraft Mac and Cheese product. There was a massive withdrawal of the product that started in 2015 and people have thought twice about picking it up in the supermarkets ever since. Although Kraft claimed it was just temporary, they were obliged to recall the products from supermarket shelves and it has got even worse since then.
The main reason for the chaos was the allegations that some manufactured batches of Kraft original flavored Mac and Cheese contained metal bits. I guess Kraft has lost the trust of consumers as the same thing happened in 2013 when the same macaroni product was recalled because Kraft has used yellow die and GMO wheat in it.
Although Kraft announced they had already removed artificial coloring from the next batches, their sales would never be the same again. It is a good thing that more people are now opting to cook Mac and Cheese from scratch.
3. Tips On How To Make Your Mac And Cheese Healthy
Let’s face it, Mac and Cheese is high in calories, sodium, and fat. I guess you cannot have it all and this super delicious meal has its ups and downs. However, you can always find a way to make this a healthy recipe. Here are some tips to help you:
Use macaroni pasta that is made out of wholewheat, which is a high source of fiber.
Buy low-fat cheese to minimize your intake of saturated fat.
Add more veggies and herbs.
Reduce the cheese and replace it with your favorite vegetable puree as it will add a twist to the taste and maintain the creamy texture.
Replace a portion of the cheese with yogurt.
Replace whole milk with low-fat milk to reduce your intake of fats.
Here is a cooking video about a healthy Mac and Cheese recipe:
Pro Tips From Other Bloggers
Of course, you won’t be able to make a perfect Mac and Cheese without learning from the experts. Here is a collection of helpful tips from bloggers, who are moms, food fans, chefs, and professionals, to guide you more the venture of cooking the ultimate Mac and Cheese.
Pro Tips on Cooking Delicious Mac and Cheese
This is a very popular website that promotes the South’s best designs and style ideas in the home. Featuring home arrangements and how to make it cozy, it also specializes in food.
Whisk warm milk into the flour mixture to ensure a lump-free sauce.
Shred your cheese first for a creamier texture.
This very useful website focuses on the kitchen and shares everything that evolves around the kitchen, like recipes, cooking tutorials, and cleaning the cooking area.
Emma Christensen writes that she does not believe in making a roux. The sauce will thicken just fine without the clumps if you just whisk a little flour with the milk before adding it to the pan.
Put in a little substance into your Mac and Cheese by adding onions, red peppers and sausage cooked with chili powder to give the recipe a big kick!
This is obviously a blog dedicated to cooking. It focuses on recipes and cooking guides for all occasions.
Julia Moskin shares that there are two schools of thoughts about what makes Mac and Cheese so great – one that says it is the super creamy sauce and the other that believes it’s the brown crust on top – but either way, homemade is always the best.
Use dried pasta if you do not like pre-cooking.
This website has become a haven of for vegan fans, but it does not mean they don’t publish recipes for meat lovers because they do! They believe that peace starts in the kitchen and promote this.
Kare, the writer of this blog, insists that more pasta should not be added to Mac and Cheese since it dries down the sauce and makes the result very disappointing!
Resist the urge to add more cheese to the sauce. The trick is to sprinkle more on top and in between.
This website creates an ambiance of the countryside and writes about delicious recipes, friends, fun living, and arts and crafts.
Ree suggests that you can save money by buying macaroni in bulk and it’s cheaper.
If you undercook the pasta before putting it in the oven it will stay firm and give you the best results.
Monique, the author of this blog, loves to publish recipes and cooking videos. In fact, she already has hundreds of how-to videos that readers are fond of.
Monique says you must not overcook Mac and Cheese. It may be a tad jiggly when removed from oven, but it will firm up as it cools.
Feel free to use other cheeses, but smoked cheddar is a must!
Sabrina, the author of this blog, is a professional chef who shares her recipes all natural and organic. It mostly consists of cooking tips that encourage readers to participate. It’s a fun blog!
The oven method makes Mac and Cheese less creamy but it’s amazing when it comes to the crust.
The important thing that makes the recipe creamy is FAT. Using low-fat products will alter the texture.
The Best Mac And Cheese Recipes Are All Unique
It may be because this recipe is very old and has evolved over time. The simple recipe of mixing pasta with cream and cheese goes a long, long, way back. Currently, there are hundreds of Mac and Cheese recipes that people have created. I wonder what your own version is? Now, let’s focus on how to make the basic Mac and Cheese pasta perfect. This is essential if you are to make your own Mac and Cheese version the best!
Here is a video that shows you how to make the perfect Mac and Cheese pasta!
1. Easy Beer Mac and Cheese
Via How Sweet It Is
Macaroni, Cheese, and BEER? You will now be wondering how this recipe tastes!
Check This Recipe!
2. BBQ Pulled Macaroni And Cheese
Via Sweet Recipeas
You will be surprised how combining pulled pork and Mac and Cheese adds to the richness of its yummy taste.
Check This Recipe!
3. Mac And Cheese Muffins
Via CincyShopper.com
Children will be delighted with Mac and Cheese cupcakes. There’s no need for plates, just pick them up, run and eat!
Check This Recipe!
4. Fried Bacon Mac And Cheese Balls
Via Kirbie’s Cravings
You’ve made muffins, now try these amazing cheese balls. Your party will be packed with kids, as these cheese balls are easy to eat and make great finger foods.
Check This Recipe!
5. Mac And Cheese Pizza
Via The Gunny Sack
If you are a pizza lover and a fanatic of Mac and Cheese as well, this is the recipe for you. With this meal, you can enjoy both pizza and Mac and Cheese in the one recipe.
Check This Recipe!
6. Mac And Cheese Patties
Via Rachael Every Day
Now if you can put these patties beside the muffin, cheese balls, and pizza, imagine what a great kiddie party that would be!
Check This Recipe!
7. Mac And Cheese Burgers
Via Unilever Food Solutions
This gives you the amazing combination of classic Mac and Cheese and burgers, all in one meal. You can make them at home and they’re easy to pack for picnics.
Check This Recipe!
8. Mac And Cheese Pie
Via Mr. Food
Who would think that we could convert a casserole into a pie? Well, we can with this pie – it’s Mac and Cheese in a slice of pie!
Check This Recipe!
9. Classic Macaroni And Cheese
Via Guiding Stars
This is the original, creamy, tasty and super delicious Mac and Cheese recipe that has evolved over decades.
Check This Recipe!
10. Lobster Mac And Cheese
Via Soffia Wardy
Who wants to have both Mac and Cheese and seafood in just the one dish? This is a delicious taste combination, where you can enjoy a spoonful of lobster and Mac and Cheese, all at the same time.
Check This Recipe!
11. Hot and Spicy Mac And Cheese
Via WikiHow
For people who are adventurous and willing to take a risk, here is a tweak on the classic Mac and Cheese recipe that will give you a great kick!
Check This Recipe!
12. Grilled Mac And Cheese Sandwich
Via Food Network
This sandwich is great for snacks and ready-to-go meals. It’s a hearty meal in a lunch box.
Check This Recipe!
13. White Chocolate Mac And Cheese
Via PopSugar
Now Mac and Cheese can be served as a dessert! When it’s combined with white chocolate chips, you’ll enjoy its sweet creamy taste!
Check This Recipe!
Selected Healthy Mac And Cheese Recipes
Here are 6 best healthy Mac and Cheese recipes for health conscious people. You’ll find there are always ways to keep every delicious recipe healthy!
1. Buffalo Chick Pea Mac And Cheese
Via Vegan Yack Attack
This vegan recipe is unusual as you do not see too often, but non-traditional recipes are definitely worth the effort.
Check This Recipe!
2. Greek Yogurt Mac And Cheese
Via Chocolate Covered Katie
This is an easy meal to make and the yogurt and spinach will give you the probiotics and vitamins you need.
Check This Recipe!
3. Creamy Butternut Squash Mac And Cheese
Via Eat Yourself Skinny
If you are looking for low-calorie Mac and Cheese, then this creamy comfort food is the one to choose.
Check This Recipe!
4. Skinny Baked Broccoli Mac And Cheese
Via Skinnytaste
This recipe is low calorie, so you can afford to sprinkle some breadcrumbs on top for a delicious taste!
Check This Recipe!
5. Vegan Gluten-Free Mac And Cheese
Via Happy Healing
The ultimate vegan and gluten-free Mac and Cheese is healthy to the last bite. It’s accompanied by cauliflower and sweet potato.
Check This Recipe!
6. Roasted Vegetable Mac And Cheese
Via An Expat Cooks
This is mixture of different veggies, namely broccoli, peppers, squash, carrots and zucchini, is like a fiesta combo Mac and Cheese. You can also replace the veggies with your own favorite choices. Dig in!
Check This Recipe!
We have reached the end of this article, which has explained the origins of Mac and Cheese and given you a complete rundown of many of the favorite recipes for this delicious dish. You have learned a great deal about its nutrition value and the essential ingredients that give Mac and Cheese its perfectly creamy delicious classic taste.
We’ve given you a complete guide to making it yourself, so good luck with cooking this hearty and sumptuous meal!.
Your mornings will never be brighter than when you have pancakes for breakfast. These little cakes topped with butter and maple syrup are the perfect energy sources to jumpstart your day. However, you really need to put extra effort into making perfect pancakes. There are a lot of ingredients, which are quite expensive, and the entire process requires accurate skills.
But in this article, we are going to show you how to make them without one popular ingredient – milk. If you just raised a doubtful eyebrow, then let me explain.
You know that the basic ingredients in baking are flour, water, and egg whites. Without these magical three, you won’t be able to even bake a bun.
They provide the bread’s structure and strength, but the remaining ingredients, such as milk make the bread more tasty, tender, moisturized, and aesthetically pleasing. Therefore, you can still make your beloved pancakes even without milk.
Alternative Ingredients
Just because the recipe’s list of ingredients includes milk, it does not necessarily mean that you need to use it. You can use an alternative one instead. There are a lot of dairy-free substitutes you could use instead, such as soy or almond milk and regular low-fat yogurt.
Make sure that the ratio of these alternatives is just the same as the milk. Also, to avoid an alteration in the taste, choose the plain unflavored milk substitute.
To provide this is possible, here are ten milk-free pancake recipes:
1. Basic No-Milk Pancakes
Yield: 8 pancakes.
Ingredients:
2 cups white flour.
4 1/2 teaspoons of baking powder.
6 tablespoons of white sugar.
1/2 teaspoon of salt.
5 tablespoons of margarine.
1 1/2 cup of water.
2 eggs.
4 tablespoons of water.
Instructions:
In a bowl, mix the flour, baking powder, sugar and salt.
Grind the chia seeds in a spice grinder. Add some water and starch. Combine well. Set aside for a few minutes until it becomes sticky.
Mix all the wet ingredients in a separate bowl. Add chia paste and then stir.
Incorporate the wet ingredients into the dry ingredients. Stir them well and then add the chocolate chips.
Preheat skillet over a medium-low heat.
Cook the 1/4 cup of batter until bubbles form.
Flip it over to cook the other side. Cook until golden brown.
Serve with toppings.
8. Whole-Grain Pancake
Yield: 3 pancakes.
Ingredients:
1 1/5 cup of quick-cooking oats.
1/4 cup of flax seeds.
1 1/2 cup of white whole-wheat flour.
1 cup of buckwheat flour.
1 cup of all-purpose flour.
1/8 cup of sugar.
1/8 cup of baking powder.
2 tsp. of Kosher salt.
1/2 tbsp. of baking soda.
Instructions:
Mix the oats and seeds in a blender until smooth.
Combine the oat mixture and the remaining ingredients in a bowl.
Store in a container in refrigerator or freezer.
9. Vegan Pancake
Yield: 6 pancakes.
Ingredients:
2 cups of all-purpose flour.
4 tablespoons of white sugar.
4 teaspoons of baking powder.
1 teaspoon of salt.
2 cups of water.
2 tablespoon of oil.
Instructions:
Mix all the dry ingredients in a bowl.
Combine the water and oil in a separate bowl.
Mix the dry and wet ingredients. Stir until smooth. A few lumps might be present.
Preheat skillet over a medium-low heat.
Cook a 1/4 cup of batter until bubbles form.
Flip it over to cook the other side. Cook until golden brown.
Serve with toppings.
10. Sweet Potato Pancake
Yield: 4 servings.
Ingredients:
1/2 pound of sweet potatoes.
3/4 cups of all-purpose flour.
1 3/4 teaspoons of baking powder.
1/2 teaspoon of salt.
1/4 teaspoon of nutmeg, ground.
1 egg.
3/4 cups of soy milk.
1/8 cup of butter.
Instructions:
Cook sweet potatoes in a saucepan of boiling water until tender.
Drain then immerse in cold water.
Remove skins, chop and smash.
Mix the flour, baking powder, nutmeg, and salt together in a bowl.
Combine mashed sweet potatoes, soy milk, butter, and egg in a separate bowl.
Incorporate sweet potato mixture to the flour mixture.
Preheat the skillet over a medium-low heat.
Cook a 1/4 cup of batter until bubbles form.
Flip it over to cook the other side. Cook until golden brown.
Serve with toppings.
Mornings will always be good with these delightful milk-free pancake recipes. If you have secret pancake recipes to share, we would be very happy to know about them!
Tell us what you think of this special breakfast favorite by leaving some comments.
I’ve always loved trying new things, especially from another culture. When I’ve had enough of Western food selections, it is fun experimenting with Asian food, like Japanese, Korean, Indian and Chinese.
Apart from their popular raw foods, Japanese cuisine is uniquely sweet and sumptuous. Whenever I eat at a Japanese restaurant, my personal pick is the Sarku Japan Chicken Teriyaki.
So, I decided to cut out the hassle of going out and to try to cook it at home instead (I also have those bad weather lazy days, you know). And besides, it gives me full control over the amount of ingredients that I use.
Feel free to change any amount of the ingredients that you desire, which will depend on the number of people you are going to serve!
Before you start, here are the things you need to prepare:
1/2 lb. raw boneless, skinless, chicken thighs.
(Note: I prefer the thighs because I believe they have more meat than legs or wings).
2 tbsp. of brown sugar. (Note: This provides a contrasting taste to the soy sauce, which is why chicken teriyaki is sweet and salty at the same time).
1/3 tsp. of baking soda. (Note: It may sound weird, but this helps to tenderize the meat more! Don’t worry, it won’t affect the taste at all).
1/2 tbsp. Shaoxing wine. (Note: Shaoxing is made from China. It may sound like an ingredient that’s as rare as a diamond, but you can actually buy it at any Asian market store near you).
1 tbsp. of soy sauce.
1 tbsp. of olive oil.
1/4 tbsp. of tapioca starch.
So let’s get our hands working!
Preparation
First of all, let the boneless, skinless chicken thighs dry. If you want other chicken parts, it’s up to you. I prefer the thighs because they are more juicier and meatier.
Next, cut them into smaller pieces that are half the size of a matchbox (or about 1-inch by 1-inch). The smaller the pieces are, the shorter cooking time.
Mix the sliced chicken, baking soda, Shaoxing wine, soy sauce, and tapioca starch in a large bowl.
Combine them well together and then leave them in the fridge for at least 24- 48 hours. Yes, patience is a virtue. You need to soak the chicken this long, so they’ll end up being tender and tasty, just as you like!
Meanwhile, in a separate sauce pot, pour the reduced chicken broth, chopped garlic cloves, and ginger. Heat until boiling, then let it simmer for at least 15 minutes.
Incorporate brown sugar and dark soy sauce. It’s up to you on how much amount you add.
In a separate small bowl, mix tapioca starch with cold water. Add the cornstarch and water mixture to the sauce pot where the broth was mixed. Mix them well until they thicken. You can prepare this ahead of time if you want.
Mixing and Cooking
Let the chicken cool to room temperature for about 30 minutes before cooking.
Set a non-stick pan on high heat, then add a tablespoon of olive oil. Make sure that the olive oil is generously spread all over the pan before adding the chicken.
Don’t fill the pot too full of chicken pieces. All of them need to get a nice searing. Continue cooking until the chicken pieces turn white at the edges. Press the chicken bits from time to time using a spatula, which will give them a further sear.
Flip the chicken pieces over once they have been seared. How long this takes depends on if you like your chicken to be crispy or not. You can always adjust according to your preference. It took me 3 minutes per side. Not bad, isn’t it?
Once it’s cooked, turn the heat off. Get the sauce mixture you prepared a while ago and mix it with the chicken.
Serve while hot! If you want, you can add some mixed fried vegetables as a side dish.
Voila! Our homemade Sarku Japan Chicken Teriyaki recipe! You don’t have to go all the way to your nearest Japanese restaurant or a thousand miles around the globe just to experience Japan. Because you can now get to experience a Japanese kind of pleasure for your tastebuds in your own home. Arigato! Enjoy cooking!
Harissa is undeniably an exotic ingredient. Just like smoked paprika or chili paste, it is not something that is either staple or ordinary. Therefore, finding the best harissa substitute can be difficult, especially if you are not aware of how this ingredient works.
The very first time I came across harissa paste was when a friend of mine introduced me to her roasted chicken recipe. She had included harissa and peas in the dish, making it more pleasurable to the tongue. After that, I made sure this ingredient was present in my spice rack.
But just as with other condiments and spices, harissa is not always available. After all, it is a regional ingredient that is only common in the Middle East and North Africa. Outside of these places, it is a rare find.
Fortunately, there is a way out of this problem. As long as you know all the potential alternatives to this spice, your life in the kitchen will be less stressful. Before revealing all of these recommended substitutes to you, I will, first of all, discuss the overall nature of harissa.
More…
What Is Harissa?
It is essential that you know the fundamentals of harissa; otherwise, you will never know how to use it properly. As I said earlier, harissa is atraditional ingredient in North Africa and the Middle East. This spice gives their dishes an authentic traditional feel. One good example of this is kebabs that taste so much better when they’re sprinkled with harissa. The spice provides an authentic, idyllic flavor with a spicy, chili-flavored tang.
Harissa is a paste made from different kinds of spices and herbs,includinggarlic, caraway seeds, coriander, and red chilies. Some manufacturers have modified the way they make harissa, but the flavor of this ingredient generally remains the same.
Many people are searching for harissa because of its capacity to enliven particular dishes. If you haven’t found any yet, don’t worry, there is still hope as there are a number of harissa alternatives for you to try.
Best Harissa Substitutes
Cooking can be bothersome, especially if you have run out of a particular ingredient and it is nowhere to be found in your kitchen or nearby grocery stores. This situation is inevitable sometimes, but it’s not impossible to overcome this predicament if you are both quick-witted and resourceful.
I have listed all of the possible ingredients that can recreate the same taste as harissa. Here they are:
Harissa Powder or Harissa Paste
Harissa comes in two different forms: powder and paste. Both harissa powder and harissa paste are interchangeable. So, if there is no harissa powder available, you can just replace it with harissa paste (if it is available), and vice versa.
These two forms have the same flavor and aroma, but their consistency is dissimilar, especially the texture. This is because the paste is not as loose as the powder. Harissa paste can be created with ingredients that are similar to harissa powder, but the paste can contain olive oil or water.
As I stated earlier, the ingredients of commercial harissa products are varied. Therefore, make sure that the blends that you choose are similar in composition to the harissa that you want.
Also, be aware of what kind of harissa you need for the recipe you are making. For example, powder harissa is not a good choice for dishes that requires a thick texture, and harissa paste is not the ideal option if you are making dry rubs for chicken and other types of barbecues. But regardless of this fact, you can interchange these two harissa products by using a 1:1 ratio.
Chili Powder as Harissa Substitute
This is another exceptional alternative to harissa. Despite being made out of a special blend, chili powder is still pretty accessible in most markets around the world.
Chili powder is made from a combination of spices that are commonly present in Latin American recipes. From this fact, you can deduce that most chili powder today is made out of cumin and dried chilies. These spices are also present in some harissa variants. As a result, their flavor palettes are not that different.
You can always use chili powder if you want your recipe to give your food a slightly moderate heat. Harissa powder tends to be hotter than ordinary chili powder, so add red pepper flakes or cayenne to the chili powder if you want your food to have an extra kick. These ingredients can emulate the strong spicy flavor of harissa.
If a particular recipe requires you to use one teaspoon of harissa, you can just replace it with one teaspoon of chili powder, but you always have the option to lower or increase the amount of chili powder, depending on your preference.
Berbere Spice as Harissa Substitute
Berbere spice has the same origins as harissa and has a similar tang, which makes it a compatible alternative. The spice originally started in the Horn of Africa. There is a misconception that berbere was first used in the northern regions of Africa, but this is completely untrue. The reason for this confusion is due to cumin and chili peppers being pretty common in North Africa.
Berbere has now branched out and is already been modified in different regions. As a result, it is a specialty choice, especially because of its flavor profile. Despite this, you can still liberally add Berbere spice to any recipe that needs harissa. Use a 1:1 ratio again.
Sriracha as Harissa Substitute
The consistency of harissa and Sriracha are worlds apart, but their flavors are undeniably a match that’s made in heaven. Sriracha is a good alternative to harissa for dishes that require a spicy punch, as the spiciness is not that overwhelming. You will find it being used in Tunisian recipes.
Sriracha also has a subtle garlic tang, which will remind you of the earthy flavor of harissa. To further improve the flavor, just add cumin, caraway, and coriander.
I find that adding these extra spices is a necessity, for Sriracha seems thin if you use it on its own. With these additives included, however, you can achieve the same consistency as harissa paste. Alternatively, you could use hot paprika to replace the three spices.
Red Pepper Flakes as Harissa Substitute
If you cannot find any of these alternatives, then you’ll have no other choice but to use red pepper flakes. Harissa and red pepper flakes are not at all similar, but they can both add heat to your food. If you only need your food to be spicy, then you’ll find that red pepper flakes are fine. But you cannot replicate the subtle, yet complex flavor of harissa with red pepper flakes alone.
If you want to thicken your recipe, you should mix red pepper flakes with Sriracha or sambal oelek, which will improve the flavor of the dish without altering its texture.
Tandoori Masala as Harissa Substitute
There are other ingredients that you can try as an alternative to harissa. One of them is Tandoori masala, which is the cousin of garam masala.
Tandoori is a native Indian spice blend that is commonly used in the making of Tandoori chicken. It is primarily based on red pepper, garlic, and coriander, which are all present in the typical harissa blend. The problem with this ingredient is that it is difficult to acquire.
Conclusion
Finding the best harissa substitute is by no means a walk in the park. Sometimes, it can get tedious, as this particular ingredient has a unique taste and texture. In fact, you may have already noticed that there are not many potential alternatives to harissa. This just goes to show that it’s not an easy job to replicate this spice blend.
Fortunately, the ingredients I have listed here are all fully capable of being a harissa substitute. They work well in different recipes and most of them are not that difficult to acquire.
Was this article helpful? If you have any other recommendations or questions, feel free to ask them to me in the comments section below!